Model Viewer
INTRODUCTION
This manual describes the modeling quality assurance system, an application called Viewer.
Viewer is a standalone tool within the pC-Nova environment which allows the user to load and interactively orient models within an empty 3D environment for Quality Assurance purposes.
This document describes the following:
The workflow and core concepts of Viewer.
How to launch, use, and exit Viewer.
VIEWER WORKFLOW AND CORE CONCEPTS
Workflow
The basic Viewer workflow is as follows:

Supported Model Types
Viewer supports loading number of Aechelon model types into its 3D environment. The supported Aechelon model types include:
Models
Moving Models
Characters
Props
Animations
Supported File Formats
Below are the file formats supported by the Viewer:
Format | Extensions |
Aechelon Model Hierarchy | .hie |
Aechelon Model Hierarchy List | .lst |
COLLADA Animation | .dae, .cdae |
Aechelon Animation | .ban, .cban |
Aechelon Animation List * | .csv |
glTF | .gltf, .glb, .cglb |
Loading animations from a CSV is supported only when running with LegacyActors OFF. Only one CSV is supported at a time, however additional CSVs may be brought in via the INCLUDE mechanism. Animation IDs are ignored except for the order in which the animation can be played. If running with some animations already loaded, they must be unloaded before being able to load another CSV.
LAUNCHING VIEWER
Viewer can be launched several different ways:
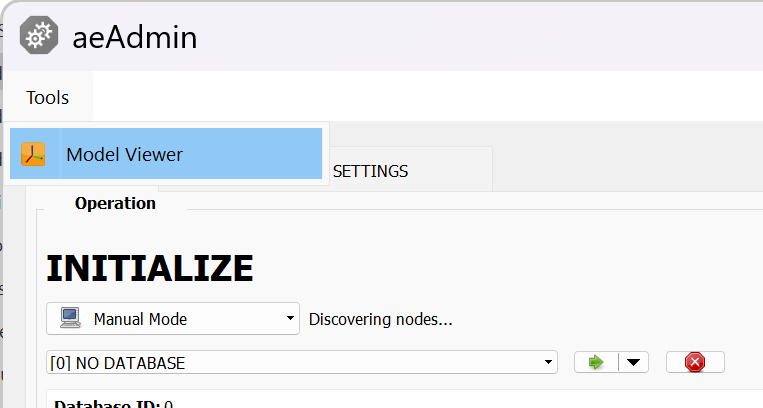
aeAdmin:
The viewer is available as a button on the aeAdmin application under Tools:
Application Extension:
The application can be found in the software directory at:
- CODE
C:\software\{{software_version}}\built\candidate\bin\optimized-x64\viewer.exe
Batch Script:
The following will be placed in a batch script (.bat) to be executed through the command line:
- CODE
C:
cd tree\depot\database\data
C:\software\{{software_version}}\built\ci\bin\optimized-x64\viewer.exe
Command Line Options
The following optional command line options can be provided when launching Viewer to control behavior. Each option is case sensitive and must be preceded by a dash (“-”).
Argument | Description |
-m modelFile | Loads the target file directly, bypassing the Open Scene dialog. Example value for a DBGS project: -m C:\tree\database\data\DB_OVERLAY\DB_GLOBAL_DOD_V20\RELEASE\V20_0\DB\DB_FEATURES\GENERIC\INSTANCED_LIB\INSTANCED\BUILDING\INST_BUILDING_176\INST_BUILDING_176.hie |
-viewport nvg | Opens the Viewer window in a side-by-side view, with the left side showing the model in OTW mode and the right side in either LWIR, MWIR, or NVG mode. |
-a animFile1 | Loads animation files (one animation per argument) if the model specified with -m is a character skin file without animations. Example value: -a C:\tree\database\data\COMMON\RELEASE\V1\DB\DB_ANIMATION\ANIMATIONS\HUMAN\ADULT\CONVERSATION\CONVERSATION_Argument_1_Loop.cban |
alternateViewer.cfg | Replaces the default viewerBaseline.cfg for token specification. Must be followed by channel name. Example value: alternateViewer.cfg VIEWER |
-p attachment.csv | Loads a CSV containing the definition of between 1 and 8 attachment points. |
-P prop.hie | Loads an initial Prop HIE to be attached at one of the CSV points. |
VIEWER USER INTERFACE
When Viewer launches, it loads one window:
The PC-Nova Viewer window
The PC-Nova Viewer window is the window in which interactive orientation of models is performed in an empty 3D environment. This window can be repositioned and resized per user preference.
If the command line argument -m is not provided on launch, a file browser dialog box will also appear.
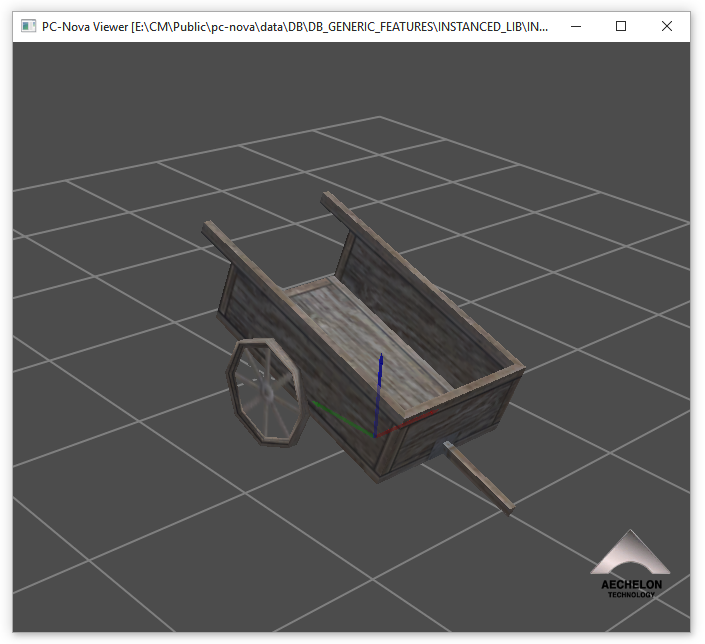
A model loaded in Viewer:
USING VIEWER
Viewer Controls
Controls in Viewer are primarily keyboard and mouse based.
Mouse Controls
Mouse Button(s) | Function |
Left-click + drag | Rotate the model around its center. |
Right-click + drag | Translate the model. |
Left-click + Right-click + drag | Zoom. Drag up zooms out and drag down zooms in. |
Open Model Controls
Shortcut Key(s) | Function |
M | Open the "Open Model" dialog, to open a model in OTW render mode. |
Ctrl + M | Open the "Open Model" dialog, to open a model in RADAR render mode. |
Alt + M | Open the "Open Model" dialog, to open a model in Isect render mode. |
Ctrl + Alt + M | Open the "Open Model" dialog, to open a model in LWIR render mode. |
Shift + M | Open the "Open Model" dialog, to open a model in MWIR render mode. |
Alt + Shift + M | Open the "Open Model" dialog, to open a model in SWIR render mode. |
Ctrl + Shift + M | Open the "Open Model" dialog, to open a model in NVG render mode. |
General Controls
Shortcut Key(s) | Function |
Y | Zoom in. |
U | Zoom out. |
R | Reset the camera to the default initial position and orientation |
W | Toggle wireframe view on/off. |
K | Toggle reference plane on/off. |
S | Toggle stats display on/off. |
L | Toggle platform lights on/off. |
. | Increase mouse/keyboard movements speed, or factor of scaling and moving operations |
, | Decrease mouse/keyboard movements speed, or factor of scaling and moving operations |
F2 | Press and hold to transition the time of day (sun moves west to east). |
F3 | Press and hold to transition the time of day (sun moves east to west). |
F6 | When loading a LST file: Toggle to view the previous model in the list. |
F7 | Or when loading a LST file: Toggle to view the next model in the list. |
G | Open and close landing gear on planes |
- = | Adjust bias to jump to the next / previous LODs immediately. |
Ctrl + - Ctrl + = | Tweak the LOD bias by a small amount by holding key down. |
Shift + C | For non-characters, toggle model LOD information on/off. |
Left Arrow | Begin rotating the model in a positive direction around the Z axis. Pressing the Left Arrow repeatedly will incrementally increase the speed of rotation. Pressing the Right Arrow will incrementally decrease the speed or stop this rotation. |
Right Arrow | Begin rotating the model in a negative direction around the Z axis. Pressing the Right Arrow repeatedly will incrementally increase the speed of rotation. Pressing the Left Arrow will incrementally decrease the speed or stop this rotation. |
Down Arrow | Begin rotating the model in a positive direction around the Y axis. Pressing the Down Arrow repeatedly will incrementally increase the speed of rotation. Pressing the Up Arrow will incrementally decrease the speed or stop this rotation. |
Up Arrow | Begin rotating the model in a negative direction around the Y axis. Pressing the Up Arrow repeatedly will incrementally increase the speed of rotation. Pressing the Down Arrow will incrementally decrease the speed or stop this rotation. |
Escape | Exit Viewer. |
Measure Mode Controls
Measure mode is also known as axis mode. When toggled on, a reference axis frame will appear around the model and can be manipulated in positive/negative directions.
Shortcut Key(s) | Function |
C | Toggle measure mode on/off. |
F3 | In measure mode: Move axis in negative X direction. |
F4 | In measure mode: Move axis in positive X direction. |
F5 | In measure mode: Move axis in negative Y direction. |
F6 | In measure mode: Move axis in positive Y direction. |
F7 | In measure mode: Move axis in negative Z direction. |
F8 | In measure mode: Move axis in positive Z direction. |
Notes:
Use the general key controls . and , to increase/decrease the speed of measure mode controls.
When Stats are enabled in Measure Mode (shortcut key S), the X/Y/Z location (in meters) of the axis frame will be displayed
Local Light Control Mode Controls
When local light control mode is toggled on, the lighting can be manipulated across X/Y/Z axes, rather than time of day control.
Shortcut Key(s) | Function |
~ | Toggle local light control mode on/off. |
F4 | In local light control mode: Move light in negative direction along the X axis. |
F5 | In local light control mode: Move light in positive direction along the X axis. |
F6 | In local light control mode: Move light in negative direction along the Y axis. |
F7 | In local light control mode: Move light in positive direction along the Y axis. |
F8 | In local light control mode: Move light in negative direction along the Z axis. |
F9 | In local light control mode: Move light in positive direction along the Z axis. |
Articulation / Analog Controls
Shortcut Key(s) | Function |
Ctrl + Shift + A | Open the "Articulation Manipulator" widget, from which a loaded model's articulations can be previewed. |
Alt + [ | Cycle through list of articulations listed in the ANALOGs at the top of the HIE. |
[ | Change the articulation / analog value. |
Shift + 0 then: 0 through 9 | Toggle through controls with ANALOG indices 0-9. |
Shift + 1 then: 10 through 19 | Toggle through controls with ANALOG indices 10-19. |
Shift + 2 then: 20 through 29 | Toggle through controls with ANALOG indices 20-29. |
Shift + 3 then: 30 through 39 | Toggle through controls with ANALOG indices 30-39. |
Shift + 4 then: 40 through 49 | Toggle through controls with ANALOG indices 40-49. |
Character Controls
Shortcut Key(s) | Function |
Shift + Space | Pause/unpause the active animation. |
Shift + Left Arrow | Jump backwards in the animation. |
Shift + Right Arrow | Jump forwards in the animation. |
Shift + Up Arrow | Reset the animation time to 0. |
Shift + J | Toggle between the jump amount times (1/60 sec, 1/2 sec, 1 sec, 10 sec). |
Shift + Page Up | Activate the previous animation. |
Shift + Page Down | Activate the next animation. |
Shift + Home | Activate the first animation. |
Shift + End | Activate the last animation. |
Shift + C | Toggle character statistics on/off. |
Down Arrow | When character statistics are ON: Toggle on/off per-bone details of the current rig (shows up to 20 bones per page). |
Right Arrow | When character statistics and per-bone details are ON: Go to the next page of bones. |
Left Arrow | When character statistics and per-bone details are ON: Go to the previous page of bones. |
Shift + ( = or + ) | If current animation is additive, increase by 5% (see more under Additive animations). If current animation uses AutoSpeedMode, increase the playback speed by 5%. |
Shift + ( - or _ ) | If current animation is additive, decrease by 5% (see more under Additive animations). If current animation uses AutoSpeedMode, decrease the playback speed by 5%. |
Shift + Backspace | If current animation uses AutoSpeedMode of translation, disable/enable the translation (it animates in place when disabled). |
Shift + Q | Toggle concurrent animation playback for the next animation change on/off. |
Ctrl + S | Load a skeleton file to use with the previously loaded model. |
Ctrl + A | Load animation(s) onto the previously loaded skin/skeleton (only if loaded model is not merged). |
Ctrl + Alt + A | Clears previously loaded animations and then load new animation(s) (only if loaded model is not merged). |
Ctrl + Shift + ( = or + ) | Increments the transition time by 0.1 seconds. This will be visible during the blend to the next animation. |
Ctrl + Shift + ( - or _ ) | Decrements the transition time by 0.1 seconds. This will be visible during the blend to the next animation. |
Ctrl + Shift + Backspace | Allows the transition time for blending from the current animation to the next one to be altered. |
Ctrl + Shift + P | Open the UI to preview prop attachment. |
Alt + J | Toggle the combine mode for the next animation change on/off. |
Alt + F7 | Toggle the skeleton lines on/off. |
Characters
Character files have either a .dae or .cdae extension (.cdae is the encrypted version of a .dae). For Maya-exported Collada files, it is possible to load the skin/skel and animation files separately. For older Collada assets (merged with colladaTool, containing both the skin/skel and all animations in a single file), the combined asset is loaded.
A character loaded in Viewer with character statistics and 3D interface toggled on.
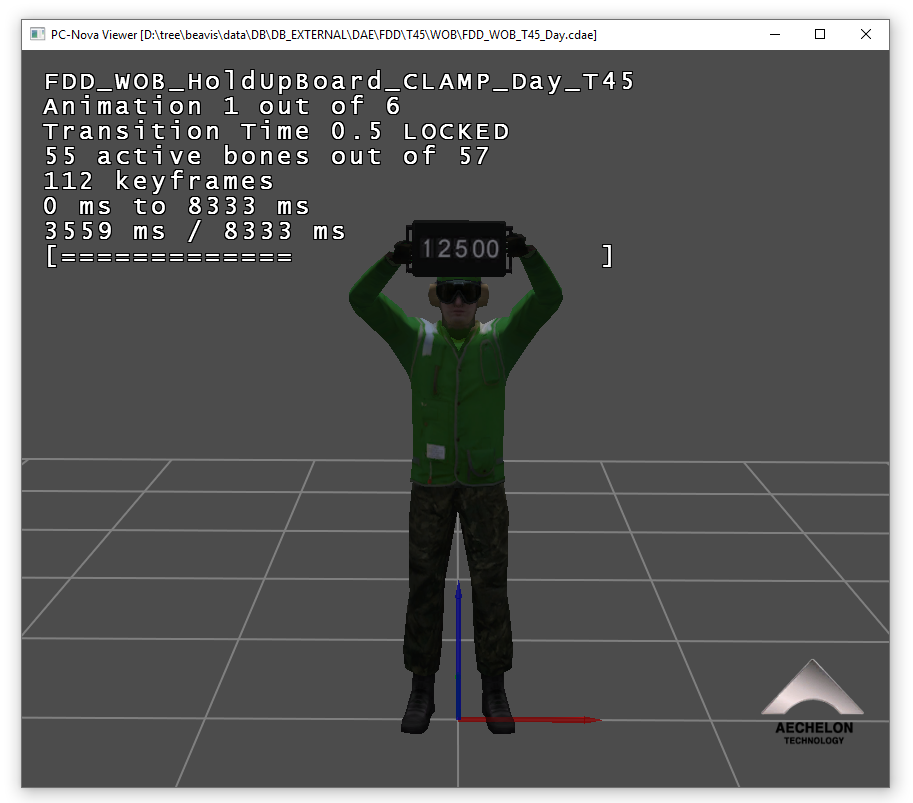
The Character Statistics Display
The character statistics display presents:
Then name of the active animation
The currently active animation and the total number of animations
The current number of actively moving bones
The number of keyframes in the active animation
The start and end of the animation (in milliseconds)
The current timestamp within the animation
A semi-graphical progress bar of the current time in the animation
Per-bone details of the skeleton
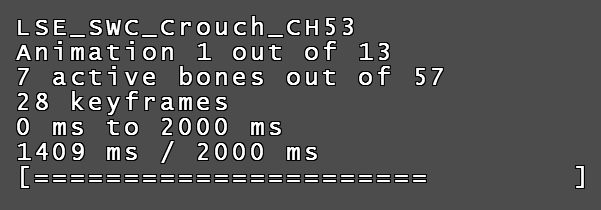
The character statistics display:
Props
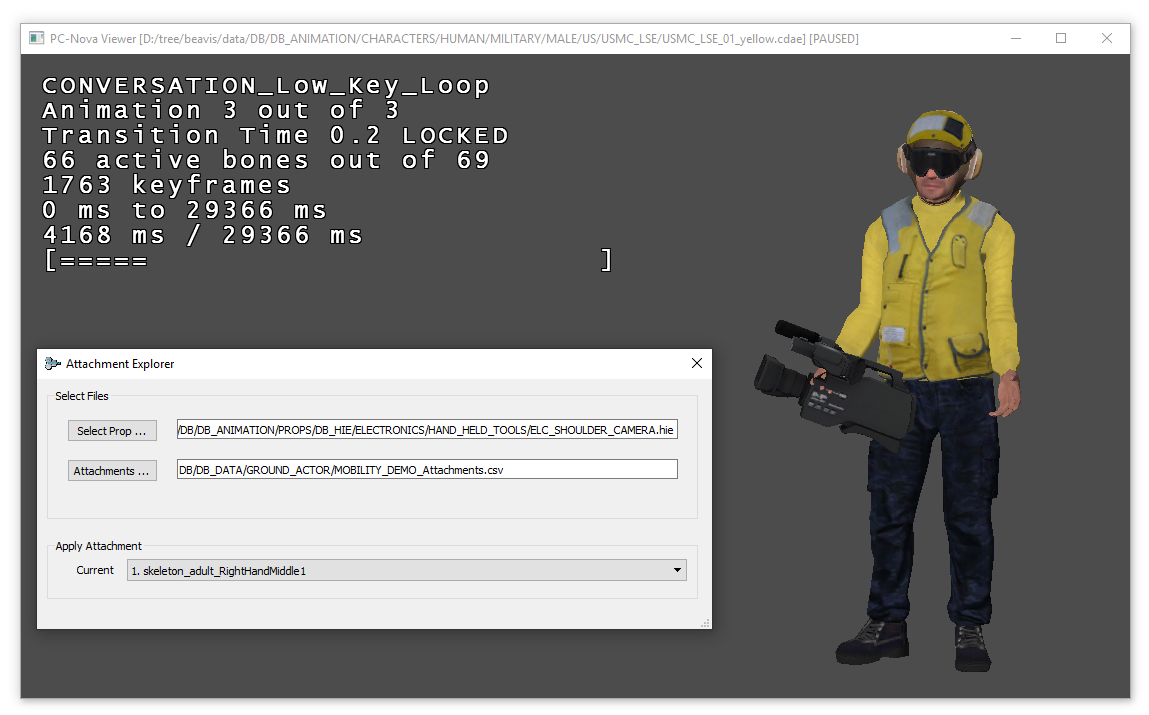
Visualizing props at various attachment points requires both an HIE containing the prop and a CSV listing the attachment points. Once a skeleton-based model/animation is loaded in Viewer, the user may open the Attachment Explorer window (Ctrl + Shift + P) to select the required CSV and HIE files to attach the prop. Once a CSV is loaded, the defined attachment points will be available for selection via the Apply Attachment menu. The default selection is always none, so the user must select a target bone in order to see the loaded HIE prop. The UI is non-modal, meaning that the current animation continues to play, and the user may navigate around the scene without closing the Attachment Explorer window.
Note that the user may repeatedly select a new prop HIE, and it will replace the existing prop. However, the CSV list of attachments point may be loaded only once per run of Viewer.
The Attachment Explorer window open to apply prop attachments on a character:
Additive Animations
To visualize additive animations (marked so during export from Maya or via colladaTool), you have to play them in combination with another base animation. In Viewer, they'll be combined with the animation that was playing just before it.
Example: If you load 3 animations with the -a argument (-a animation1.dae -a animation2A.dae -a animation3.dae) and put the additive one in the middle (animation2A in this example), as you cycle through the animations forward with Shift + Page Down, the additive one will be combined with animation1. As you cycle through the animations backward with Shift + Page Up, the additive animation will be combined with animation3. If you only load 1 animation and it's marked as additive, you'll get a clump of polygons near the origin.
To increase or decrease the frame at which the additive animation is held, use Shift + + and Shift + -on the numpad.
Viewing SW Nodes
SW (switch) nodes for moving models can be set up to be seen in the Viewer.
Take part of a simple example HIE:
G lights
     {
       SW SW_analog_3
       {
           LIGHT e2c_luces.lux
       }
     }
The switch node desired to be viewed can be renamed to SW_analog_#. The number represents what articulation number the switch is connected to. The articulation definition for the switch can be defined at the top of the file as:
ANALOG SW_analog_3 3When using Viewer, the switch node state can then be viewed by using the { and } keys. In this case, pressing } + 3 will start increasing the analog 3 value. Once value >= 1.0, the switch node state can be viewed.
See this HIE for examples of articulation and switch node definitions:
DB/DB_HIE/M_AIRCRF/A330_MRTT_RAAF_0616.hieViewing Palettized Models
This section only applies to database features that utilize palettized textures. The vast majority of these features are generic models in older, UTM Aechelon databases.
If viewing a model that uses a texture palette (large texture atlas that contains textures for all features of a type), the loaded model will not display database-specific textures. For instance, if you're loading a tree from a UTM database, but the trees in that database use a different texture palette than the what's in DB/DB_DATA, you will not see the correct tree texture. You will see the texture from DB/DB_DATA. Viewer does not natively support file-finding with these texture files.
To see the correct texture in Viewer, search in your db_<project>.cfg file for the TEXLib_File token and copy this token into your viewer override CFG file (don't forget to delete it afterwards). Viewer should now load up the correct texture for the database.