Autonomous Traffic
Introduction
Nova supports autonomous traffic on roads and waterways. The traffic simulation is rendered using feedback from the Simulation of Urban Mobility (SUMO). Offline data can be read into the simulation to create the advanced traffic patterns and routing. There is plenty of customization available including the types of models, the number of vehicles in the scene, and the placement of dynamic exclusion zones.
Configuration
Several tokens are needed to setup the auto traffic simulation.
CIGI
File | Token | Value | Notes |
|---|---|---|---|
data\versions\dlls\config_host_if_cigi.cfg | AutoTrafficDllEnable | ON | Assumes you're including ovrd_host_cigi.cfg |
Nova
File | Token | Value | Notes |
|---|---|---|---|
ovrd_node_local.cfg | GndTargetFilterNormals | ON | Prevents the vehicles from jittering on bumpy roads |
ovrd_node_local.cfg | ConfigTgts_File | DB/DB_CONFIG/config_tgts_auto_traffic.cfg | There are special visual models for auto traffic so you should set your config tgts to load them. |
Traffic Data
While the traffic data can be downloaded and built on the fly for anywhere you go, it's faster to install it if it already exists. Typically auto traffic data is placed on the system under E:\CLIPMAPS\autotraffic or E:\CM\data\autotraffic
Runtime Control
The auto traffic feature is controlled using the following CIGI Component Control Packets. Each component control packet shares the same Component Class and Component ID value.
Component Class: Global Terrain Surface (8)
Component ID: 0
Instance ID | Functionality Mapping | Description | Control Parameter |
0 | enableAutoTraffic | Enables or disables the auto traffic | CompState [0,1] |
max_vehicles | The maximum number of vehicles in the simulation. | CompData[0] as float [0,512] | |
draw_range | The maximum draw distance for the auto traffic targets | CompData[1] as float | |
vehicle_lights | Enables or disables the vehicle lights | CompData[2] as char CigiBaseCompCtrl::LSB | |
ship_lights | Enables or disables the ship lights | CompData[2] as char CigiBaseCompCtrl::Ord3 | |
1 | exclusion_zone[].enable | Enables or disables the given exclusion zone | CompData(0) as long
Exclusion Zone from CompData
|
2 | exclusion_zone[] | Clears the exclusion zone | Exclusion zone as CompState |
3 | exclusion_zones[].vertices[] | Sets a set of vertices for the exclusion zone | Exclusion zone as CompState CompData[0] as float for vertex 1 CompData[1] as float for vertex 2 |
Advanced Setup
Downloading New Areas
Once auto traffic is enabled you can simply visit a new area to download and build traffic simulations on an Internet connected IG, but it is preferable to do this processing before hand as it can often be a lengthy process due to OSM server-side request throttling.
To download new areas, you run autoTrafficSim.exe with the --batchBuild argument.
autoTrafficSim --batchBuild
The autoTrafficSim --batchBuild command allows users to specify a bounding box to download and build sims for:
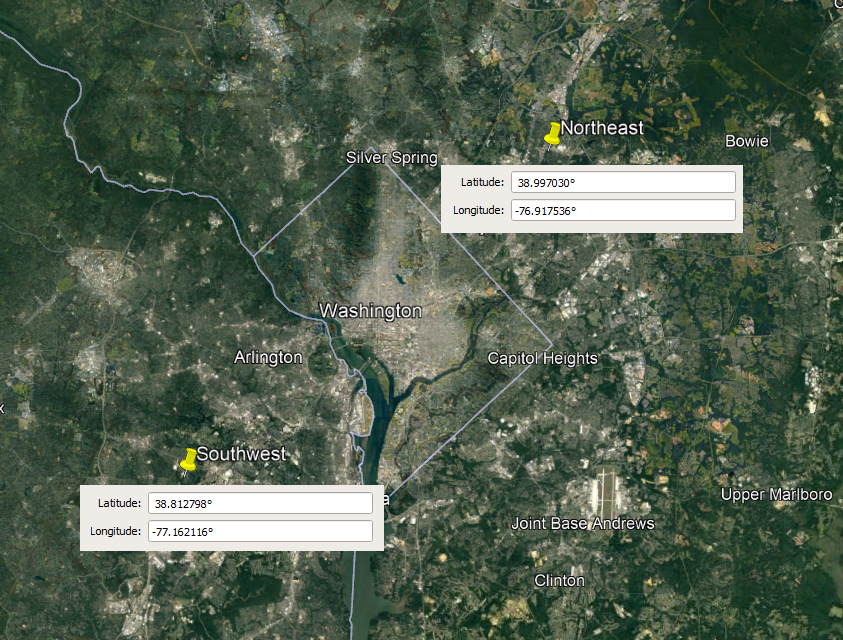
--batchbuild arg Allows simulations to be built for a large area by specifying the bounding box in geo coordinates south(lat),west(lon),north(lat),east(lon) ...As an example, to create a scenario in Washington DC the following positions would be suitable:
And the command would look like this:
E:\CM\data>E:\CM\software\<version>\bin\optimized-x64\autoTrafficSim.exe --cfgFile autoTraffic.cfg --batchBuild 38.812798,-77.162116,38.997030,-76.917536As the command executes you'll be given feedback as depending on how large the area is (and if the server is throttling your requests) the operation can take a long time:
[2022-07-26 10:38:41]    INFO [autoTrafficSim]: Downloading and building 121 simulations for 38.812798,-77.162116,38.997030,-76.917536 ...
[2022-07-26 10:44:02]    INFO [4682.6264]: Completed building simulation 1 of 121. [0.83%]
[2022-07-26 10:44:09]    INFO [4684.6265]: Completed building simulation 2 of 121. [1.65%]
As an example, downloading and creating simulations for all of Switzerland with the default settings took about 27 hours.
Some important notes:
--versionsRoot must be specified to locate python.exe and sumo
--cfgFile should be specified to ensure the correct simulation parameters are used for building
You must run the command from the directory you run pC-Nova, e.g. your "data" directory.
autoTrafficSim --rebuild
As previously mentioned, when creating new simulations, the bottleneck is downloading the data.
If you already have the data downloaded at the correct level (AutoTrafficBboxZoomLevel) but need to change some SUMO simulation parameters you can run autoTrafficSim with the --rebuild option:
Turn on wrapCopy as text
--rebuild Rebuilds simulations even if they existThe --rebuild option must be used with the --batchBuild argument to specify the area you'd like to rebuild or --batchBuild all to rebuild your entire cache. For example:
E:\CM\software\<version>\bin\optimized-x64\autoTrafficSim.exe --cfgFile autoTraffic.cfg --batchBuild all --rebuildFrom there autoTrafficSim will query your cache and update you on the progress:
[2022-07-26 11:14:50] INFO [autoTrafficSim]: Rebuilding all 27492 simulations in autoTrafficData/14 ...Rebuilding is significantly faster than downloading and building.
Where downloading and building Switzerland from scratch took about 27 hours, rebuilding took about 3.5 hours.
Configuring Visual Models
The default autoTraffic.cfg settings select models from the config_tgts_auto_traffic.cfg file to use for traffic.
If you need to use another config_tgts file or would like to change the models that can be used you'd modify the following tokens:
File | Token | Value | Notes |
|---|---|---|---|
data\versions\dlls\autoTraffic.cfg | AutoTrafficVehicleTypes | A comma separated list of type IDs from ASIGN_TER_SIMPLE to use | This should be limited to vehicle models that are a maximum of 5m in length |
data\versions\dlls\autoTraffic.cfg | AutoTrafficTruckTypes | A comma separated list of type IDs from ASIGN_TER_SIMPLE to use | This should be limited to truck models that are a maximum of 7.1m in length |
data\versions\dlls\autoTraffic.cfg | AutoTrafficBusTypes | A comma separated list of type IDs from ASIGN_TER_SIMPLE to use | This should be limited to bus models that are a maximum of 15m in length |
data\versions\dlls\autoTraffic.cfg | AutoTrafficShipTypes | A comma separated list of type IDs from ASIGN_SEA_SIMPLE to use | |
data\versions\dlls\autoTraffic.cfg | AutoTrafficPedestrianTypes | A comma separated list of type IDs from skins.csv to use | Pedestrians are experimental and not for customer use |
It's important to note the lengths mentioned in the notes above. If the visual model dimensions don't match with SUMO's internal sizes, vehicles will clip into each other.
See https://sumo.dlr.de/docs/Vehicle_Type_Parameter_Defaults.html for specifics on SUMO vehicle dimensions.
Note that these are configurable and I have made the bus length longer in code.
Removing Vehicle Shadows from Buildings and Bridges
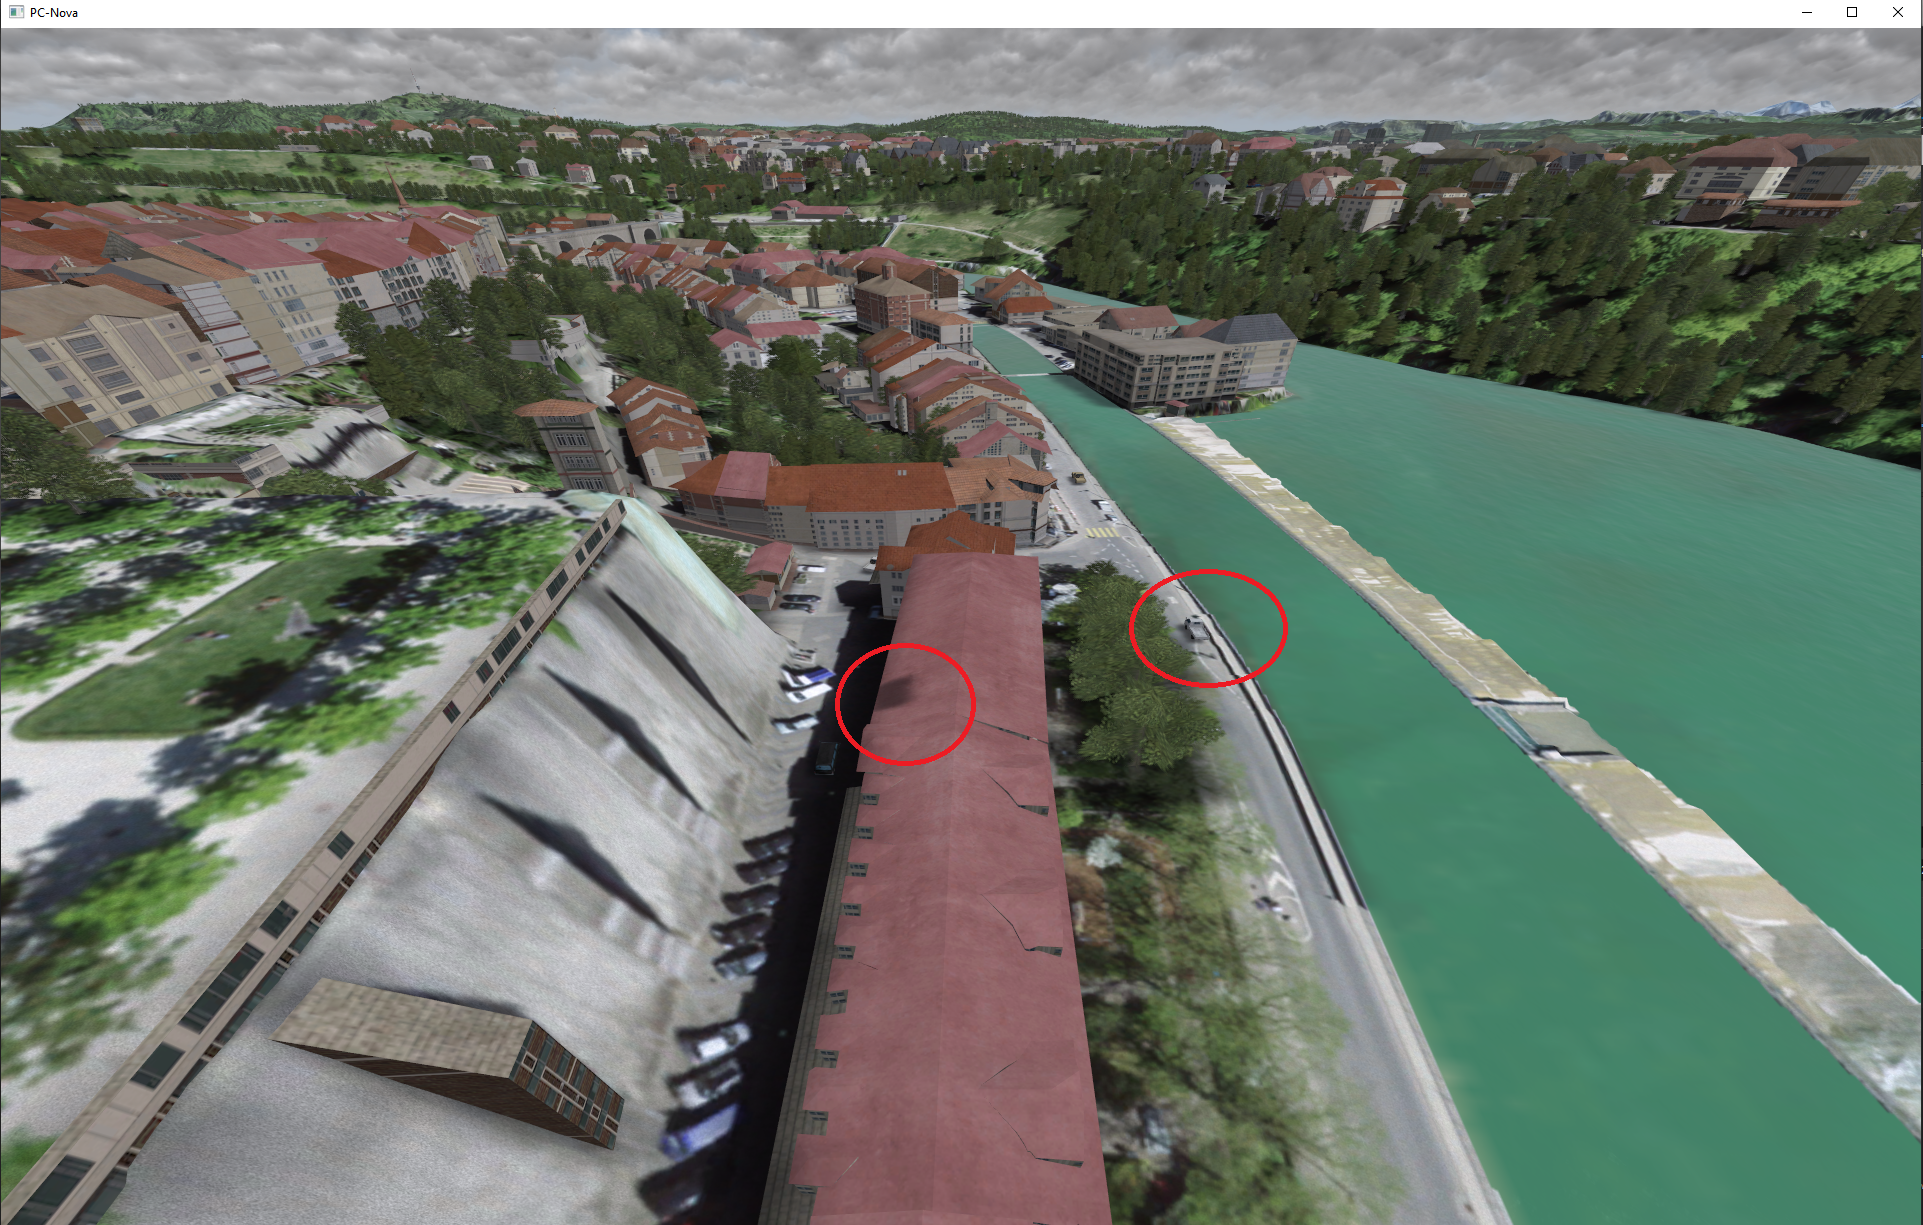
If you notice vehicle shadows on the top of buildings, trees, or bridges like the image shown here you need to modify the following token:
File | Token | Value | Notes |
|---|---|---|---|
DB\DB_SYSTEM\DB_SYS_DATA\PROJSHADOWS\ProjShadows.fx | TARGETS_USE_DEPTH_BUFFER | ON | This isn't a free. Check for performance drops. |
Tuning Traffic Density
Enabling All 512 Vehicles
While there are 512 simple_gnd_target_hv slots in the ICD, only 256 of them are supported by default. To enable all 512, you need to modify some pC-Nova FX parameters:
File | Token | Value | Notes |
|---|---|---|---|
DB/DB_SYSTEM/DB_SYS_DATA/ICD/ICD.fx | NUM_SIMPLE_GROUND_TARGETS | 512 | |
DB/DB_SYSTEM/DB_SYS_DATA/UBER/Uber.fx | UBER_ICD_MAXSIZE | ??? | There is no way to calculate this. As of 7/26/2022, I've been making this 300,000 larger. |
DB/DB_SYSTEM/DB_SYS_DATA/UBER/Uber.fx | UBER_NET_MAXSIZE | ??? | There is no way to calculate this. As of 7/26/2022, I've been making this 300,000 larger. |
DB/DB_SYSTEM/DB_SYS_DATA/UBER/Uber.fx | UBER_RENDER_MAXSIZE | ??? | There is no way to calculate this. As of 7/26/2022, I've been making this 300,000 larger. |
Simulation Tile Size
The size of the simulation tiles is controlled by the AutoTrafficBboxZoomLevel token, which can be set to one of the level found here: https://wiki.openstreetmap.org/wiki/Zoom_levels

In testing we've found that level 14 proves to be a good default for rotary wing aircraft as it provides decent traffic density and reduces the visibility of the "seams" between tiles.
For fixed wing aircraft you may want to use larger tiles to provide more vehicles in the distance.
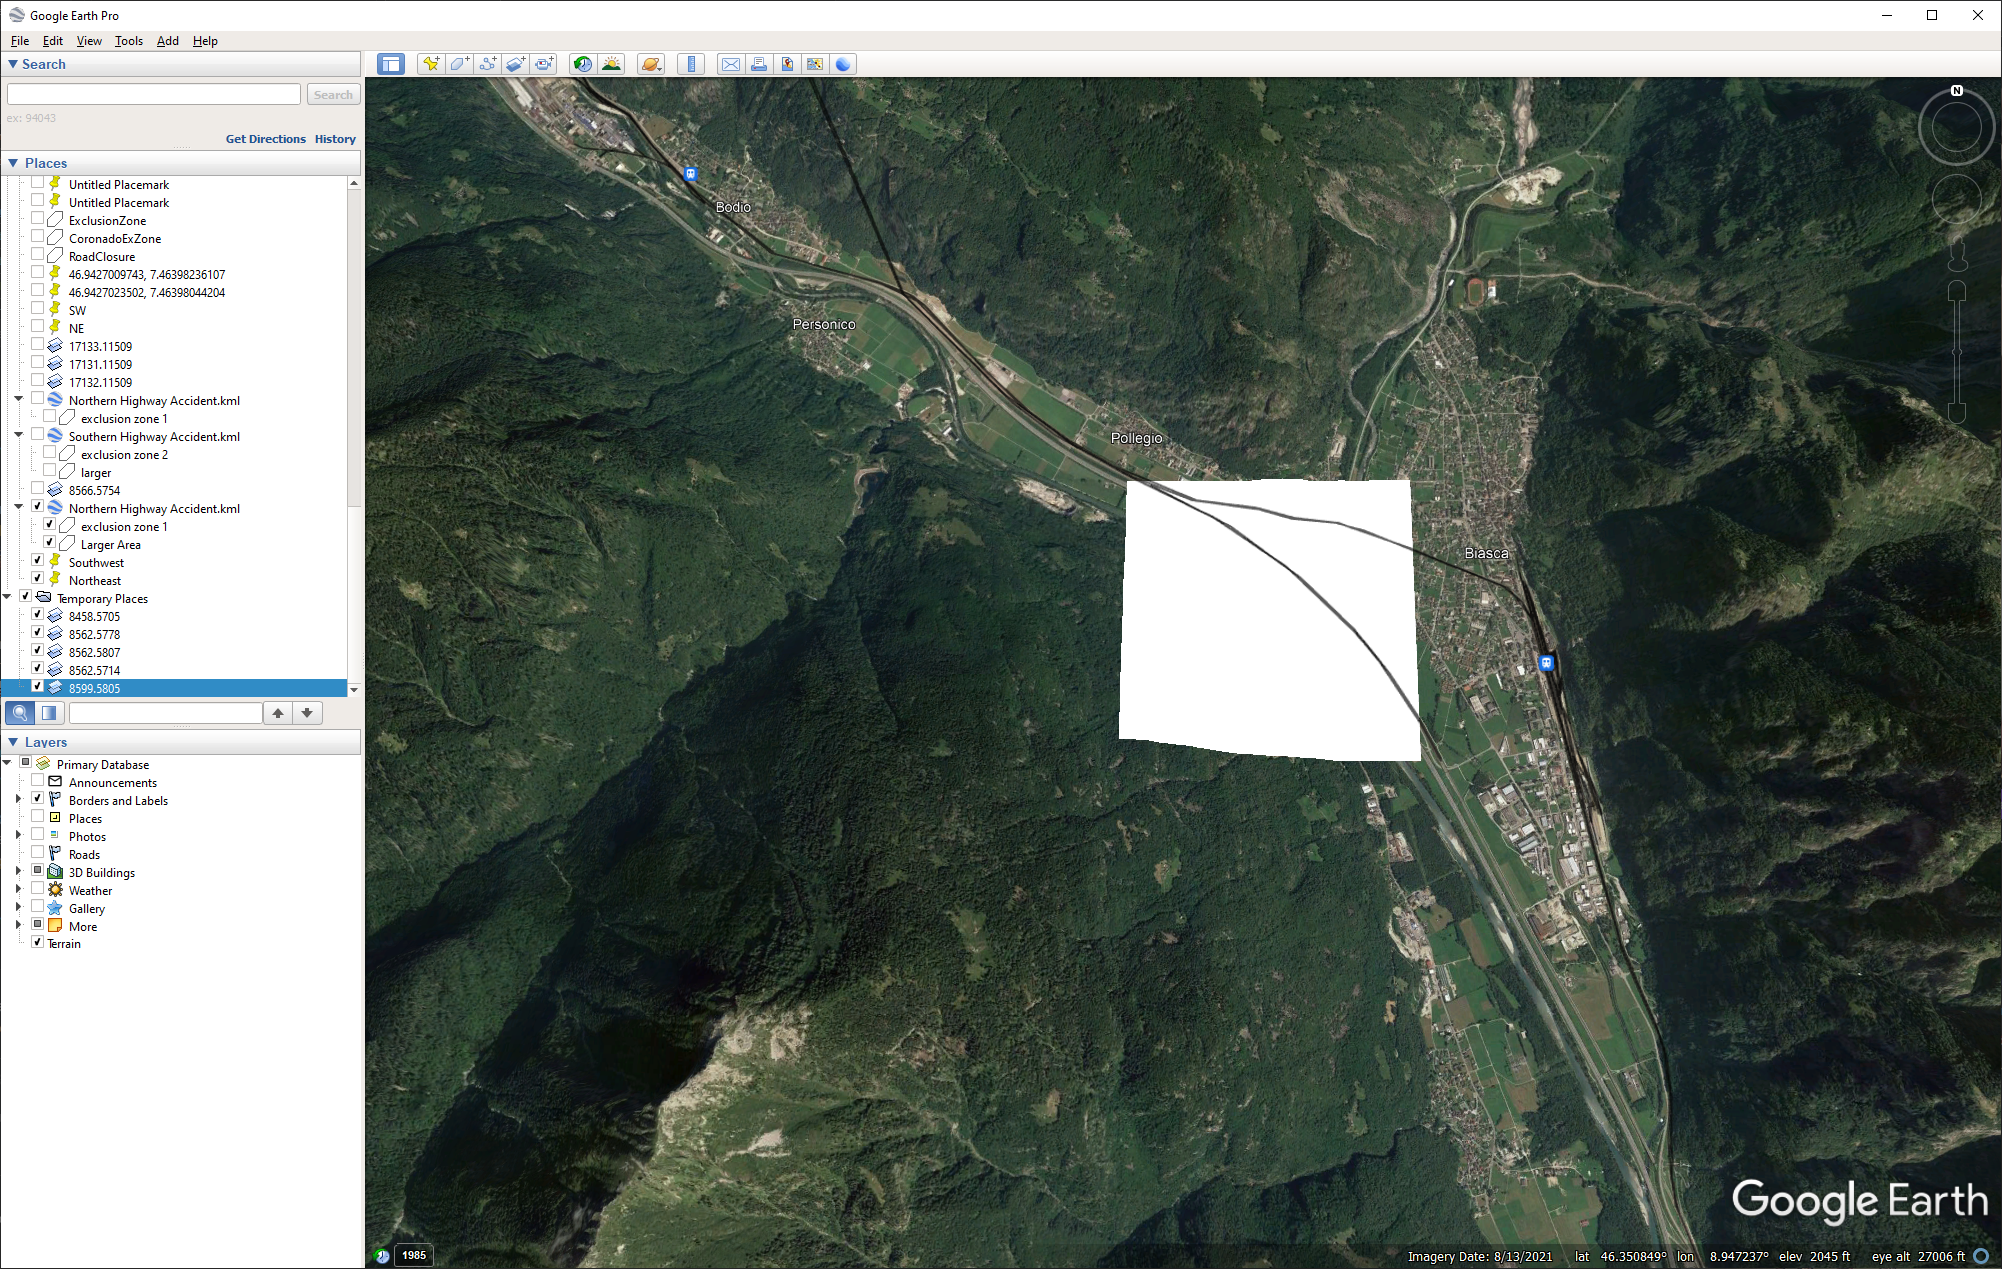
Note that each traffic tile in the cache directory contains a bbox.kml file showing the area of coverage:
Creating More Vehicles
The quick way to achieve this is to increase AutoTrafficMaxVehicleScale.

The image on the right has AutoTrafficMaxVehicleScale set 3 times higher than the left.
NOTE: It may be tempting to crank this token way up but at some point the traffic will jam and you'll hit performance issues indicated by stuttering vehicles.
Paging in Vehicles Faster
When flying at high speeds the traffic might not page in fast enough. This can be tackled by loading the simulations before you actually get to the tile and by advancing the simulation time when a tile is first loaded to skip the "building up effect".
AutoTrafficLookaheadSeconds will extrapolate the ownship position to load simulations ahead of time depending on your speed and direction. AutoTrafficStartSeconds will "fast-forward" a simulation when it's first loaded to make sure the maximum amount of vehicles are inserted.
Only Rendering Vehicles in the FOV
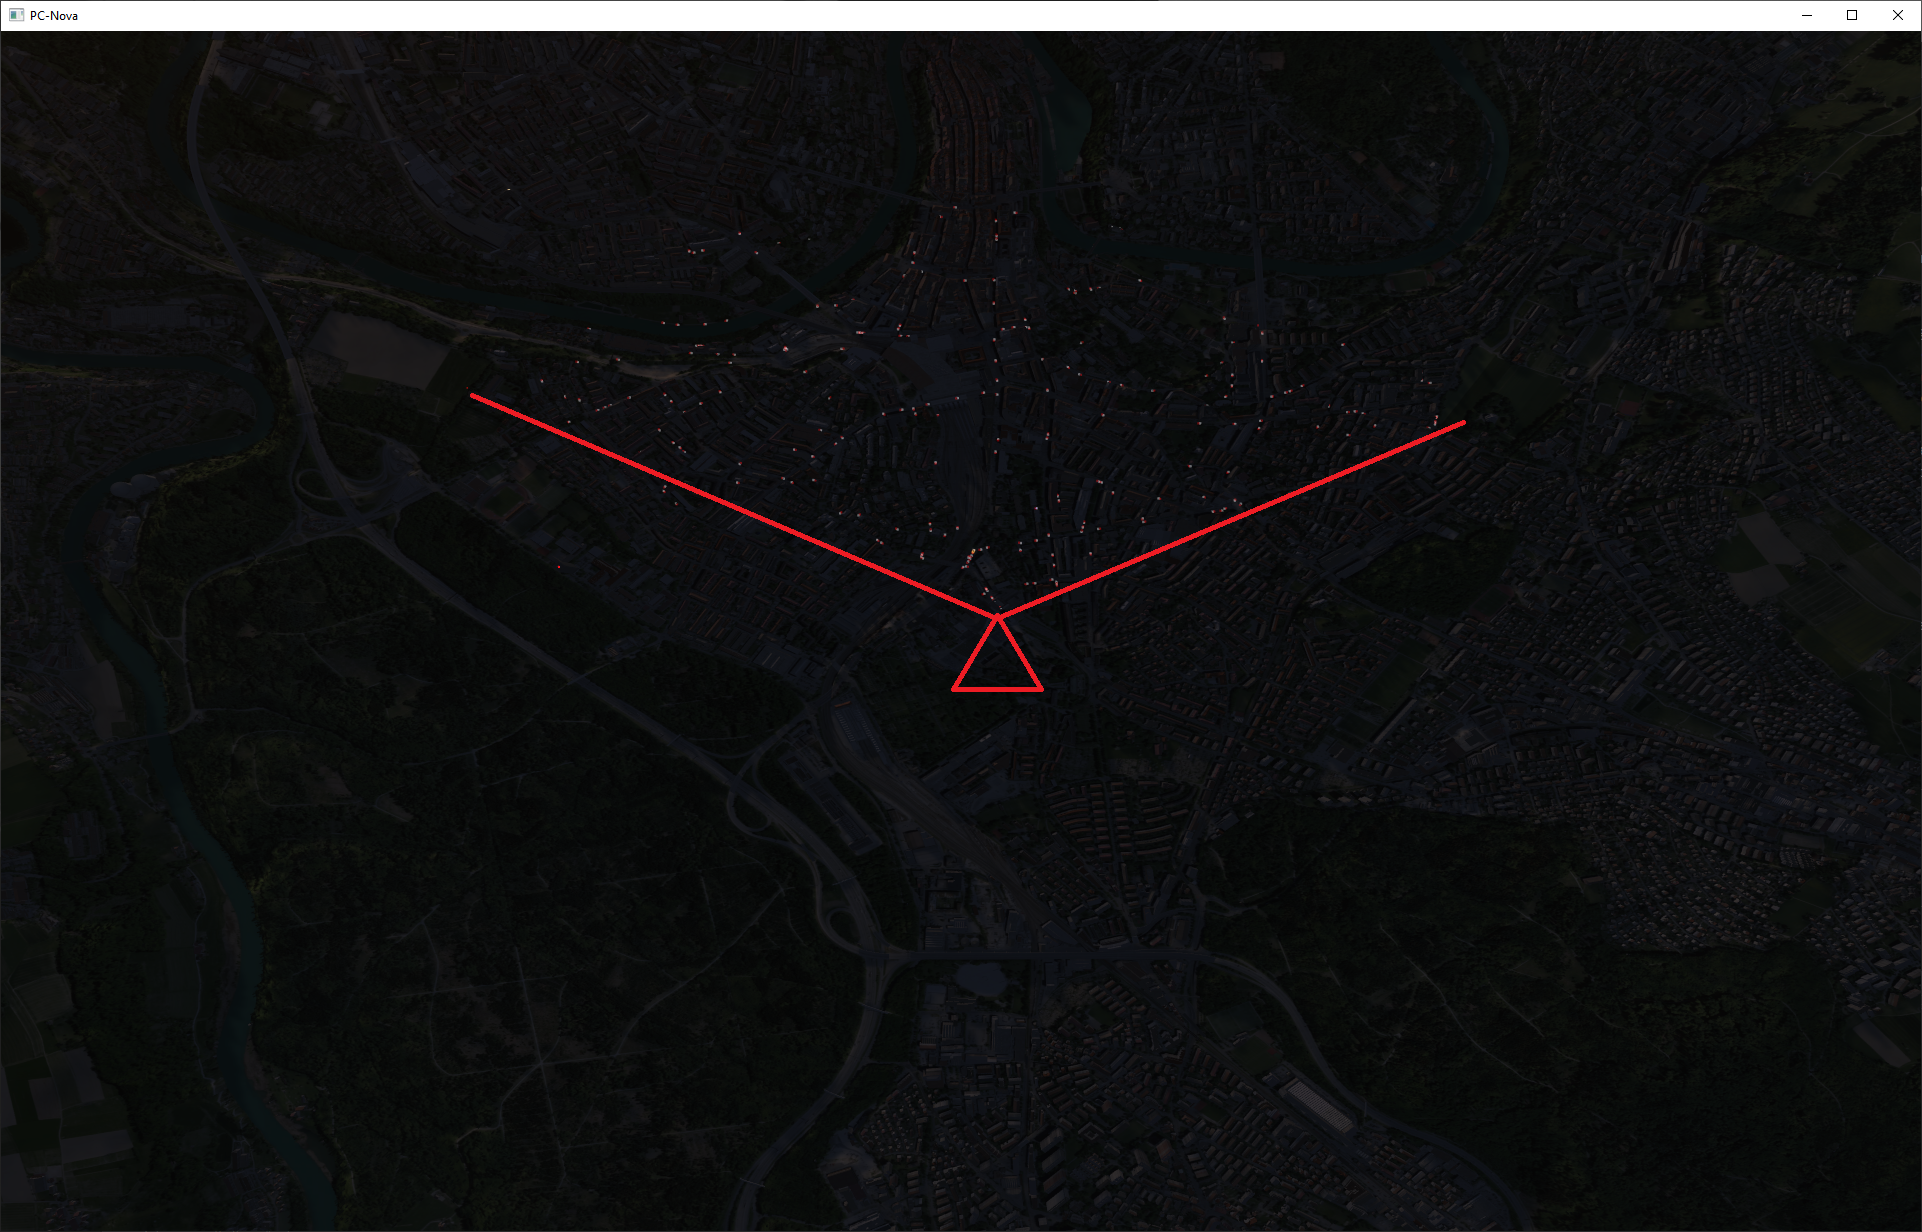
The AutoTrafficRenderFov token allows us to set a vertical FOV for rendering the traffic.
In this image I've placed the ownship 10000 feet above Bern Switzerland with AutoTrafficRenderFov set to the default 120.0 degrees.
I then used the ownship_offset to move the camera to look straight down to show that the traffic is only rendered 120.0 degrees in front of the ownship.
Here's AutoTrafficRenderFov 360.0, which effectively disables the token and renders the closest traffic all around the ownship.
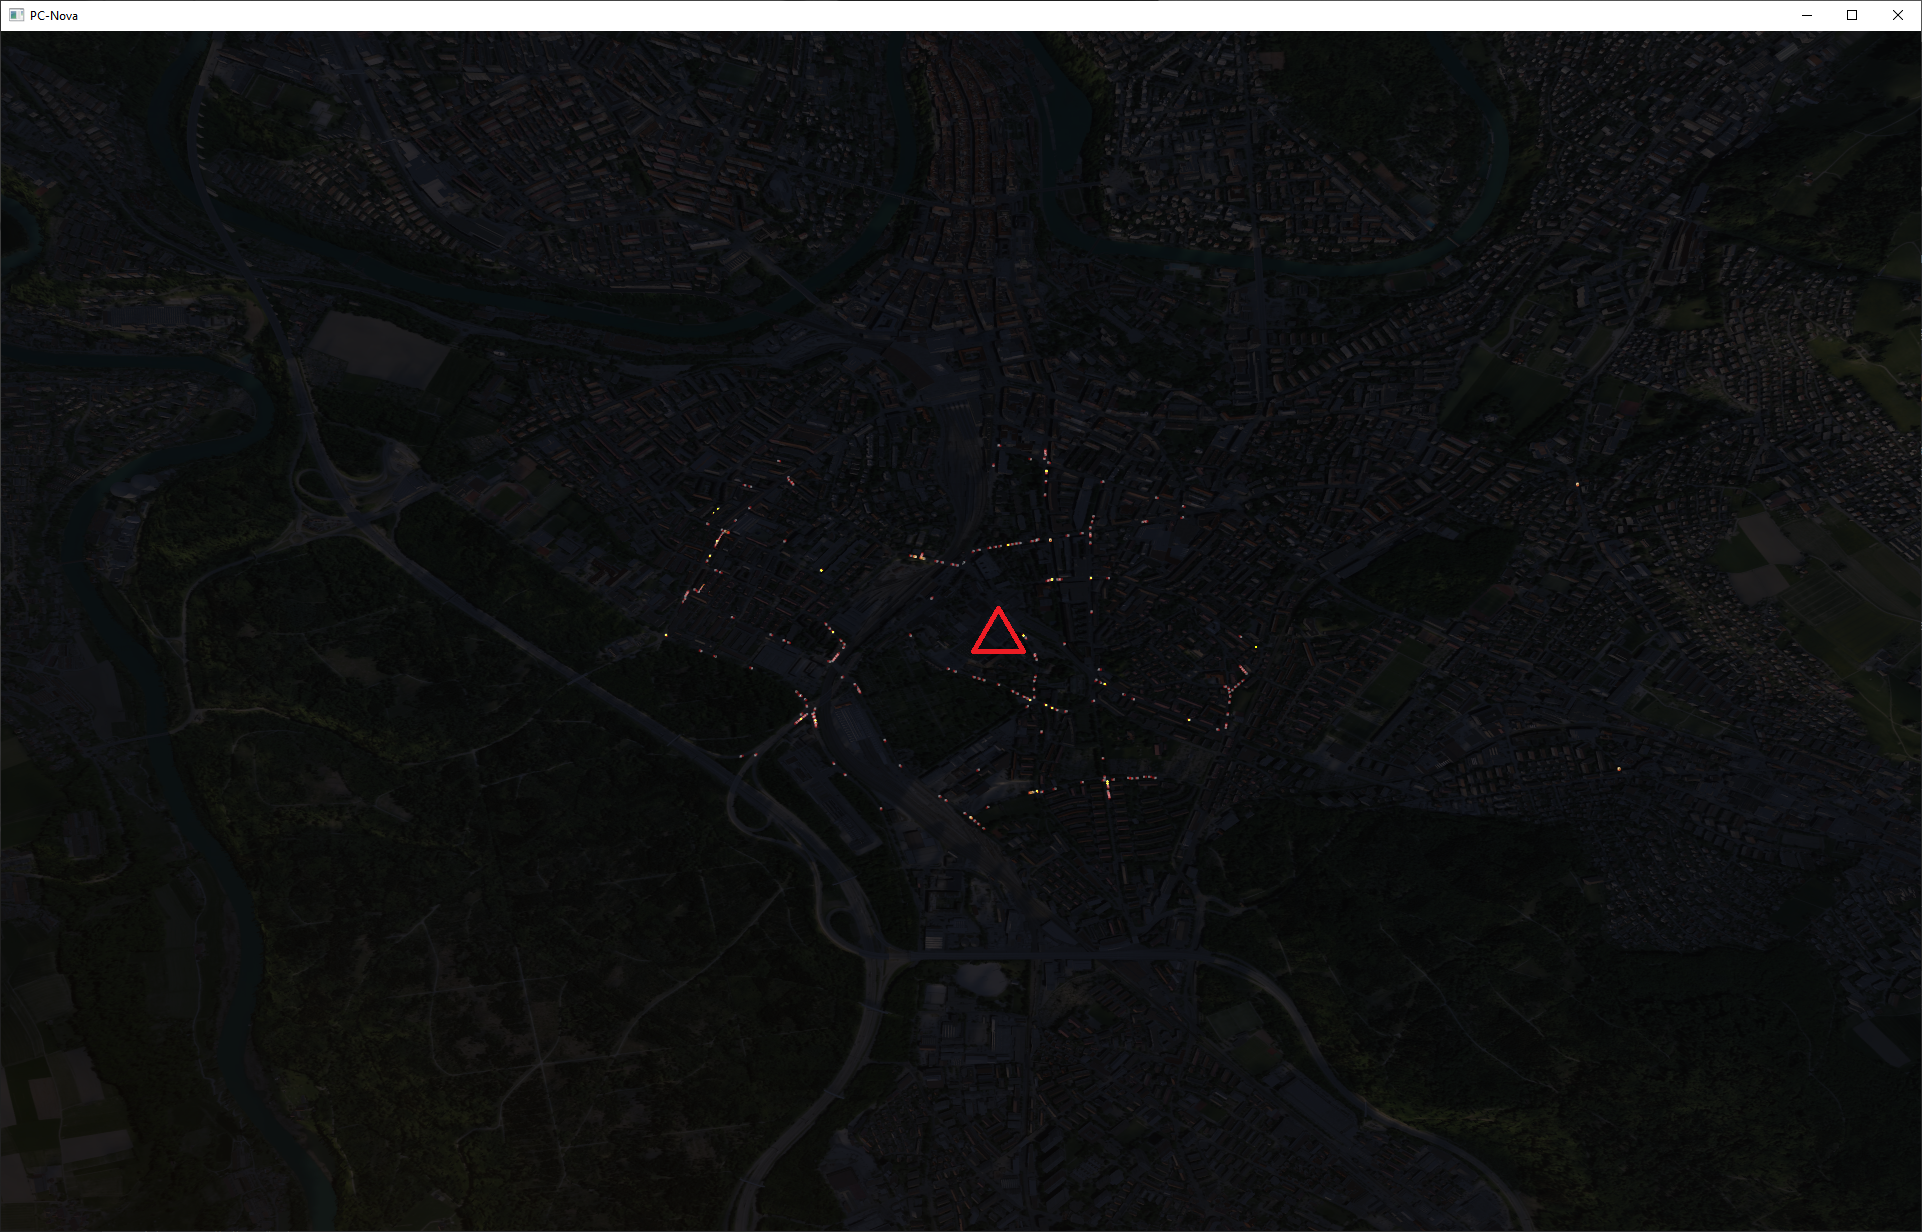
As you can see, by only rendering the closest vehicles in front of the eyepoint we can increase the density on screen.
Note that my ownship_offset test illustrates how this will look in a stealth or weapon channel however.
Vehicle Lights in the Distance
Auto traffic can be created quite far from the ownship in some configurations, to the point where the models won't be visible but their lights should be.
If you want a model's headlights/taillights to be visible at further distances you may need to modify the light's VANISHDISTANCE in the model's .db file.
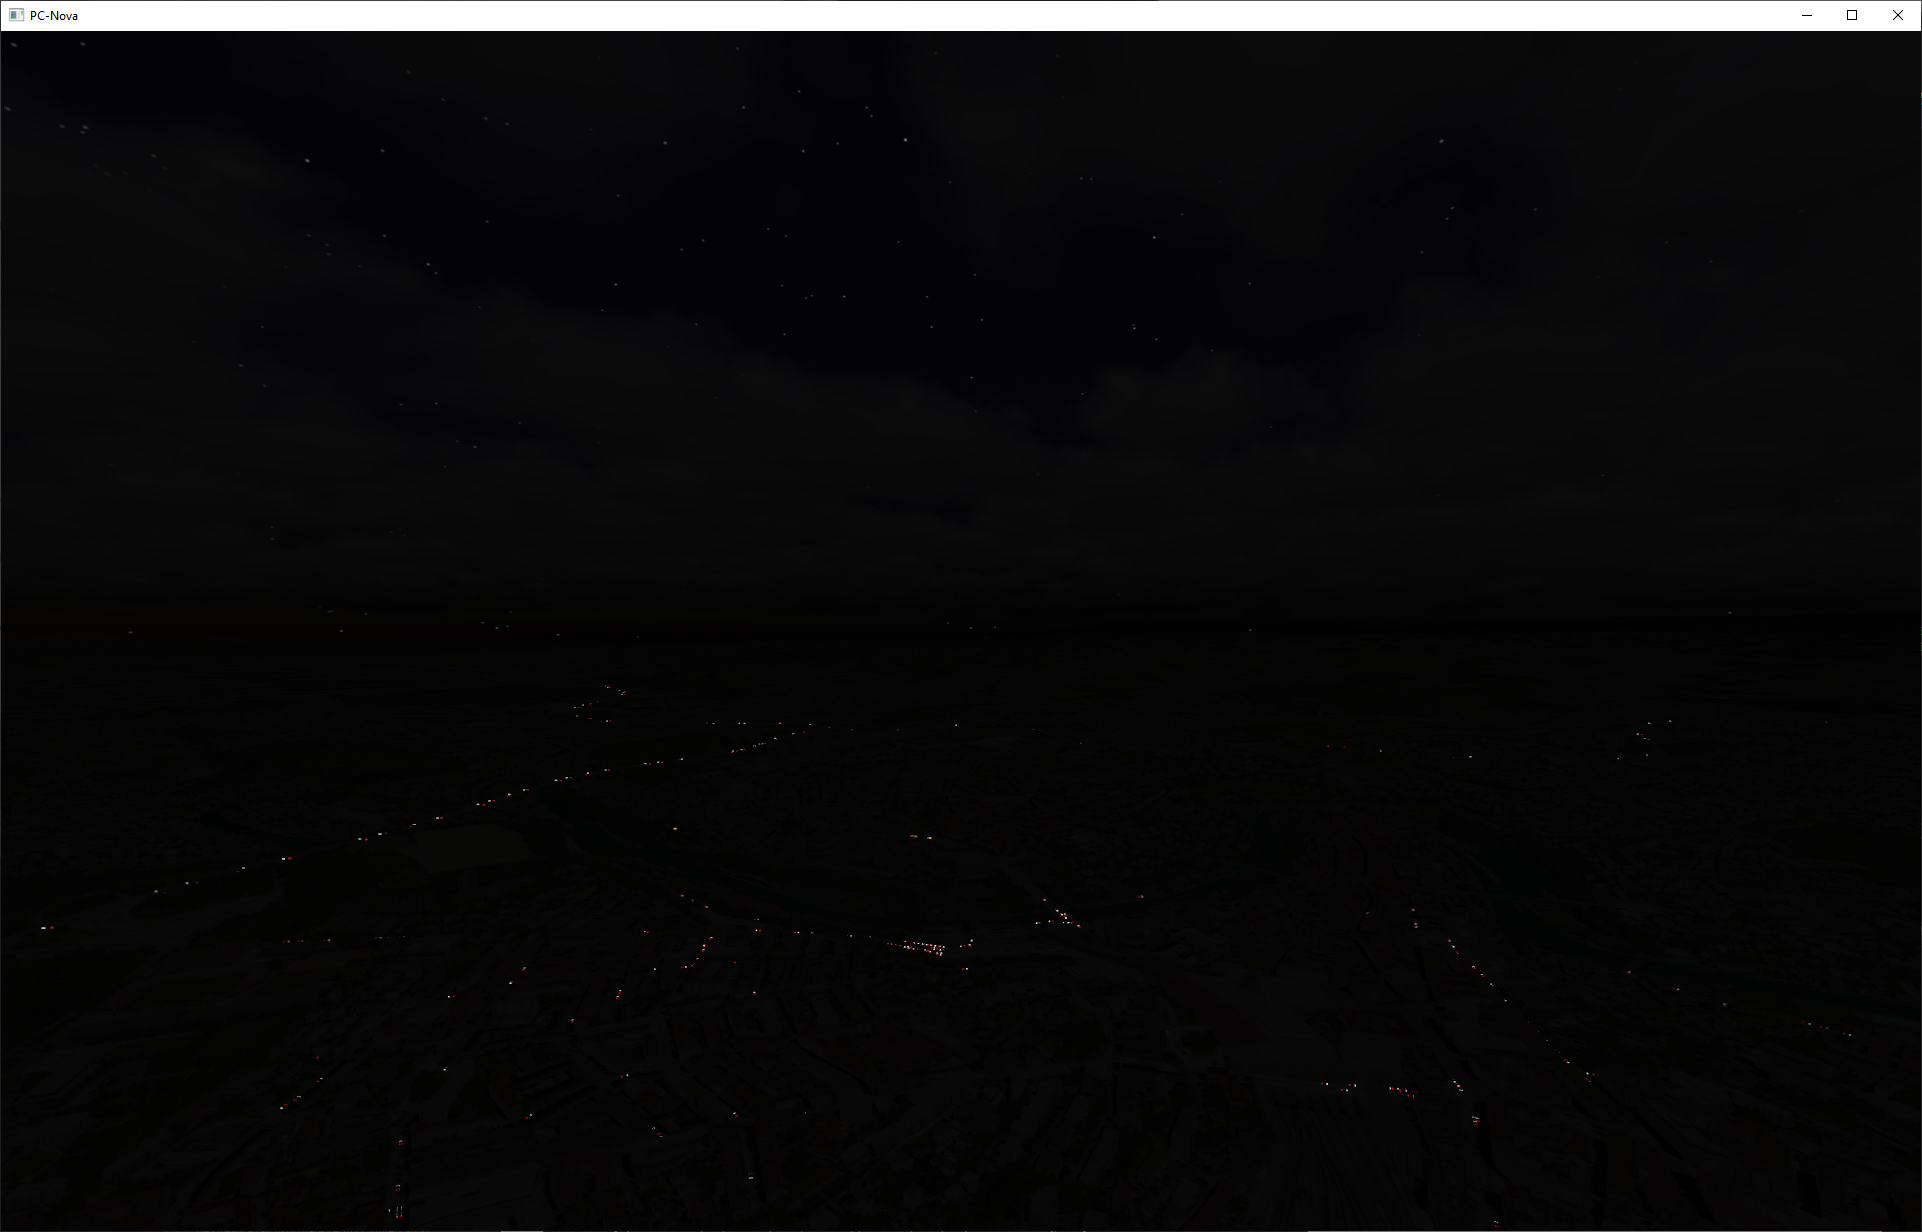
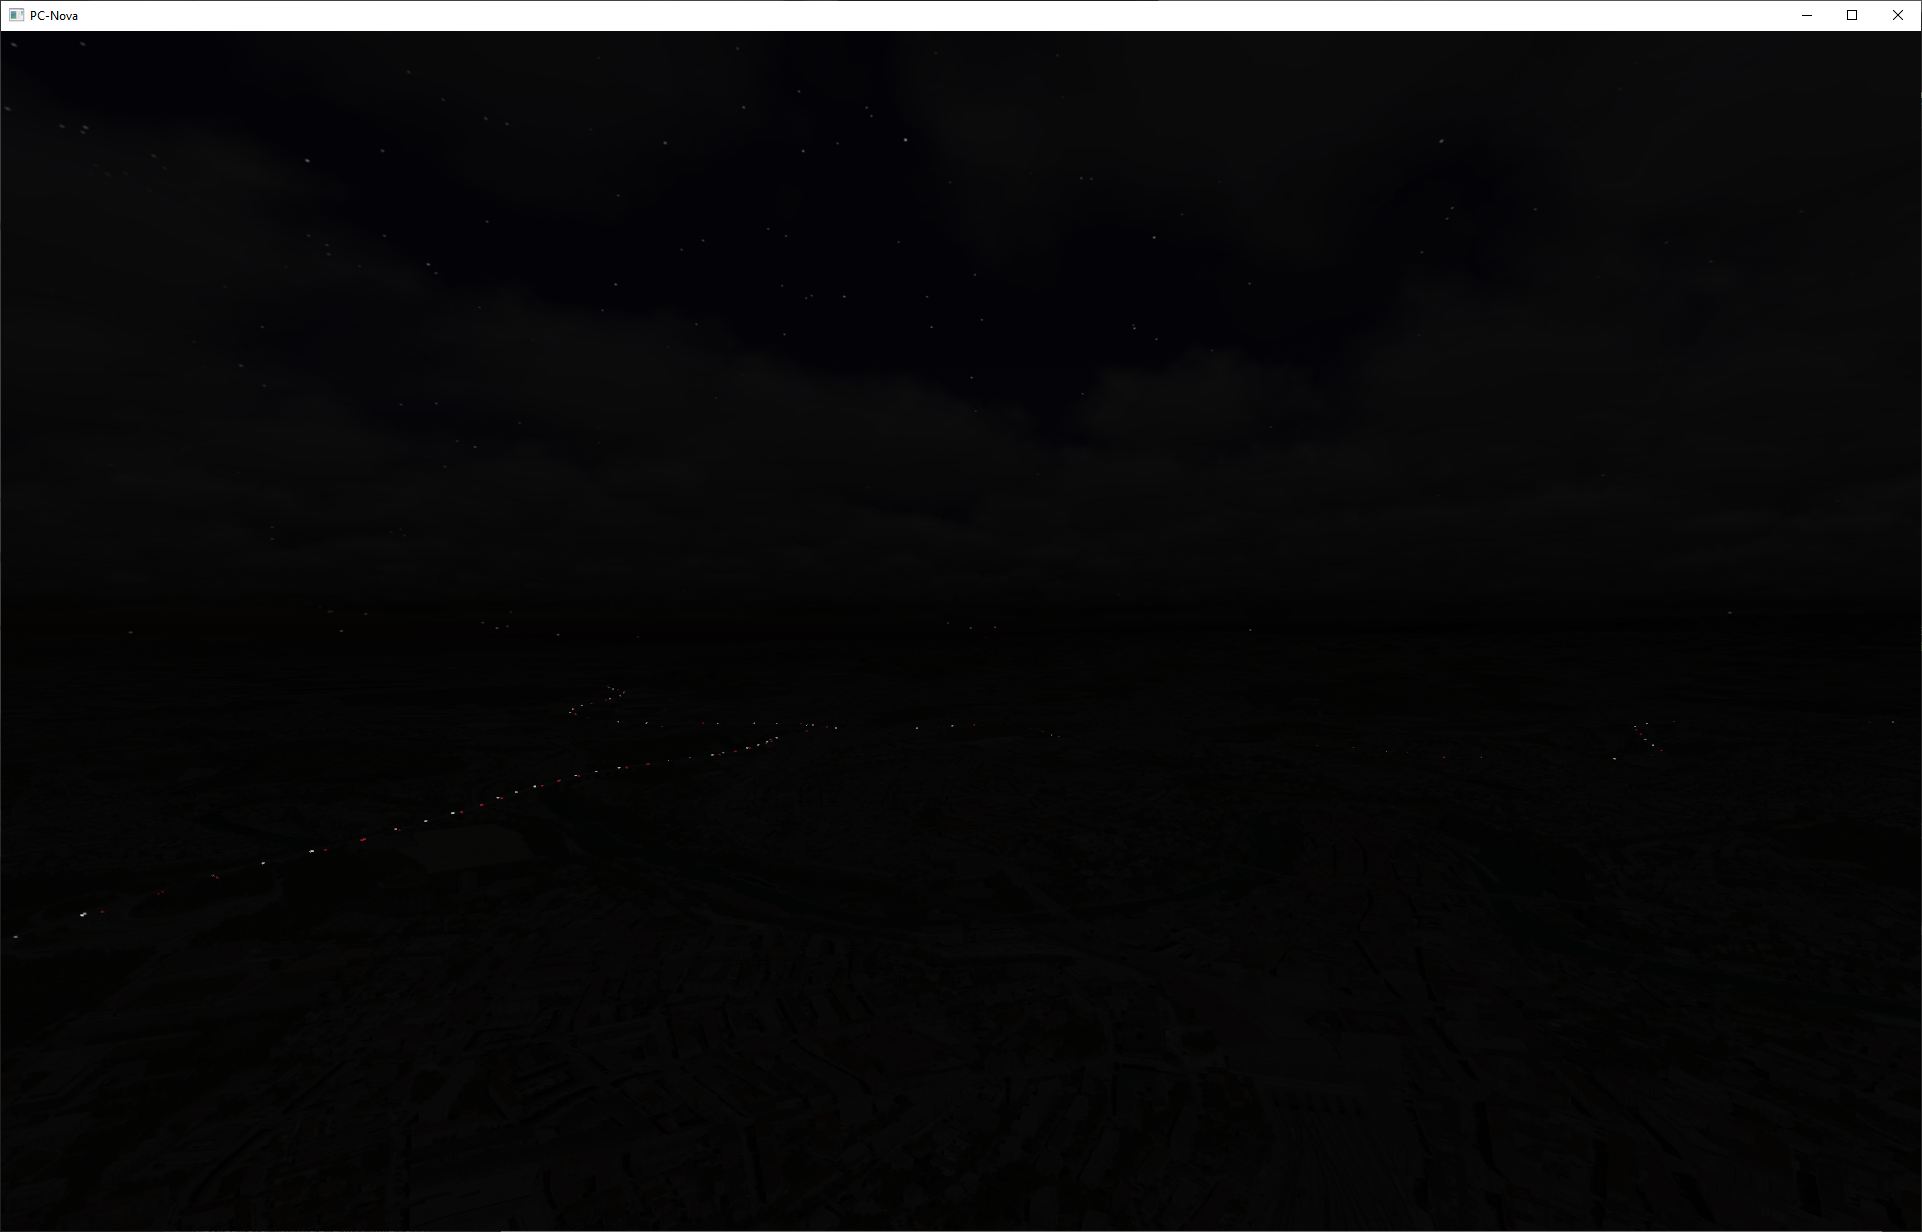
Using "road_traffic" in the Distance
The auto traffic will also control the following ICD fields if AutoTrafficRoadTrafficControl is ON to render vehicle lights beyond the auto traffic vehicles at night.
Field | Description | Value | Notes |
|---|---|---|---|
host2pcnova->h2ig.dat.fx_data.road_traffic.intensity | Global traffic intensity adjust. Values = 0-255, (default = 127, maps to 0-2.0) | 127 | We set the default here. |
host2pcnova->h2ig.dat.fx_data.road_traffic.density | Global traffic density adjust. Values = 0(no traffic), 1, 2, 3, 4(default),5, 6(highest density) | 4 | We set the default here. |
host2pcnova->h2ig.dat.fx_data.road_traffic.speed | Global speed adjust. Values = -3 to 3, 0=default db speed | 0 | We set the default here. |
host2pcnova->h2ig.dat.fx_data.road_traffic.fadeInDistance | Near range at which alpha value is 50% | Variable | We set this to the range of the furthest rendered simple_gnd_target. |
As an example, the first image is auto traffic + road traffic and the second has the auto traffic vehicle lights turned off to illustrate the difference.
Disabling Downloading Data at Runtime
This can be accomplished by turning the AutoTrafficRuntimeBuildEnable OFF.
Exclusion Zones
Exclusion zones are polygonal areas defined at runtime that prevent the auto traffic from routing through. This can be to prevent traffic from running through damages areas or to setup a safe zone for landing. When an exclusion zone is activated traffic will re route around the area if possible. If not, traffic will back up until the exclusion zone is lifted. Nova supports up to 255 exclusion zones.
Exclusion zones should be at least 100x100 meters to prevent anomalies in the simulation.
General Info
AutoTrafficDebug STATS
f you add the keyword STATS to the AutoTrafficDebug token, e.g. AutoTrafficDebug STATS,BRIDGES, some auto traffic status messages will be printed to the console every 10 seconds:
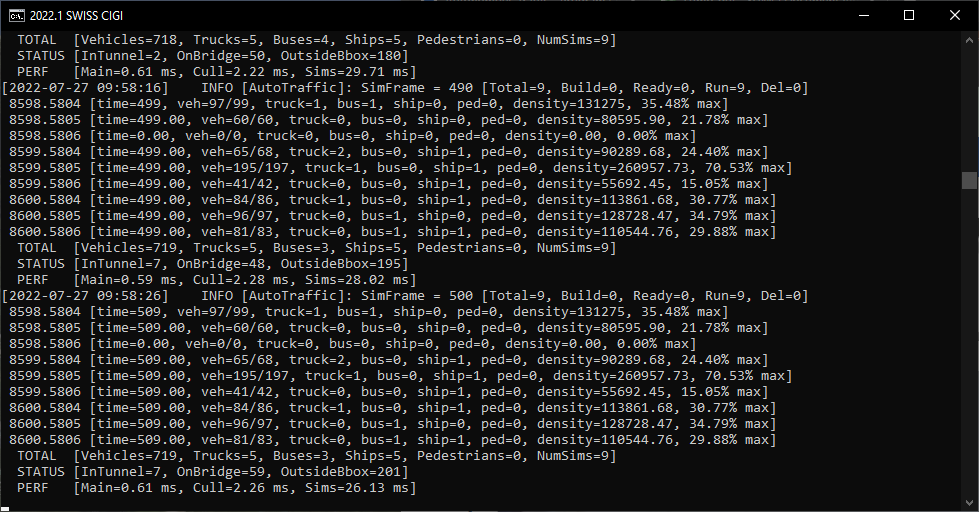
Let's take a closer look at the information contained in the STATS.
INFO [AutoTraffic]: SimFrame = 1030 [Total=9, Build=0, Ready=0, Run=9, Del=0]
This message is printed by autoTraffic.dll, which spawns autoTrafficSim.exe instances around the ownship and collects their data.
It's telling us that it's on frame 1030 (it runs at 1Hz) and that their are 9 autoTrafficSim.exe instances running (by virtue of AutoTrafficSurroundingTileDepth 1).
Of these 9, all 9 are running. If new simulations were being built for a new area, you'd see them in Build, the Ready, then they'd switch to Run.
Finally, as you fly along and tiles are unloaded they're placed in a queue for deletion, indicated by Del.
8598.5804 [time=1039, veh=98/99, truck=1, bus=0, ship=0, ped=0, density=131275, 35.48% max] 8598.5805 [time=1039.00, veh=60/60, truck=0, bus=0, ship=0, ped=0, density=80595.90, 21.78% max] 8598.5806 [time=0.00, veh=0/0, truck=0, bus=0, ship=0, ped=0, density=0.00, 0.00% max]
Each of the sims prints some info as well, uniquely identified by their XXXX.YYYY tile name.
Of interest is veh=X/Y where X is the number of active vehicles, and Y is the maximum.
The density is the length in meters of all passenger vehicle accessible lanes in the tile and what percentage of AutoTrafficDensityScalingMax this is. If AutoTrafficDensityScaling is ON this will be used to determine how many of the max_vehicles to distribute to the sim.
TOTAL [Vehicles=719, Trucks=5, Buses=2, Ships=6, Pedestrians=0, NumSims=9] STATUS [InTunnel=7, OnBridge=43, OutsideBbox=195] PERF [Main=0.60 ms, Cull=2.25 ms, Sims=37.84 ms]
Next, we have some more autoTraffic.dll stats.
We're shown the TOTAL number of objects by type across all the sims.
We're provided some STATUS on how many objects are in a tunnel, on a bridge, or outside their simulation bounding box. The OnBridge can be useful to debug performance issues because it gives some insight into how many vehicles have conform_roadways on. Roads that are intersected by the simulation bounding box are included in the network so vehicles can drive outside their tile into adjacent simulations. OutsideBbox shows how many vehicles are outside their bounding box and won't be rendered (we don't want cars driving through each other).
Lastly, PERF gives some performance stats. Main is the nova thread, which just updates the ICD and leaves the heavy lifting to the other threads to avoid effecting the frame rate. Cull is the thread that manages calculating the distance and bearing of all simulated objects to only render the closest that are in the FOV. It runs at the same frame rate as pC-Nova. The Sims thread collects object updates from all the running simulations and runs at 1 Hz.
Using the Hidden Spy 'Stealth' Camera to View Traffic
The Spy has a hidden tab that allows you to move the camera to targets. Very useful for viewing the traffic!
Depending on whether you're running in CIGI or Standalone you can add the following Spy token to enable the hidden tab:
Mode | File | Token | Value | Notes |
|---|---|---|---|---|
Standalone | data\versions\dlls\spy.cfg | SpyTabs | Stealth | This token is actually a comma separated list supporting Playback,IOS,Stealth. |
CIGI | data\versions\dlls\config_host_if_cigi.cfg | SpyTabs | Stealth |
Switching to the Stealth tab in the Spy you can now check "Override Eyepoint and Show Target" and select any of the active targets to move the camera to.
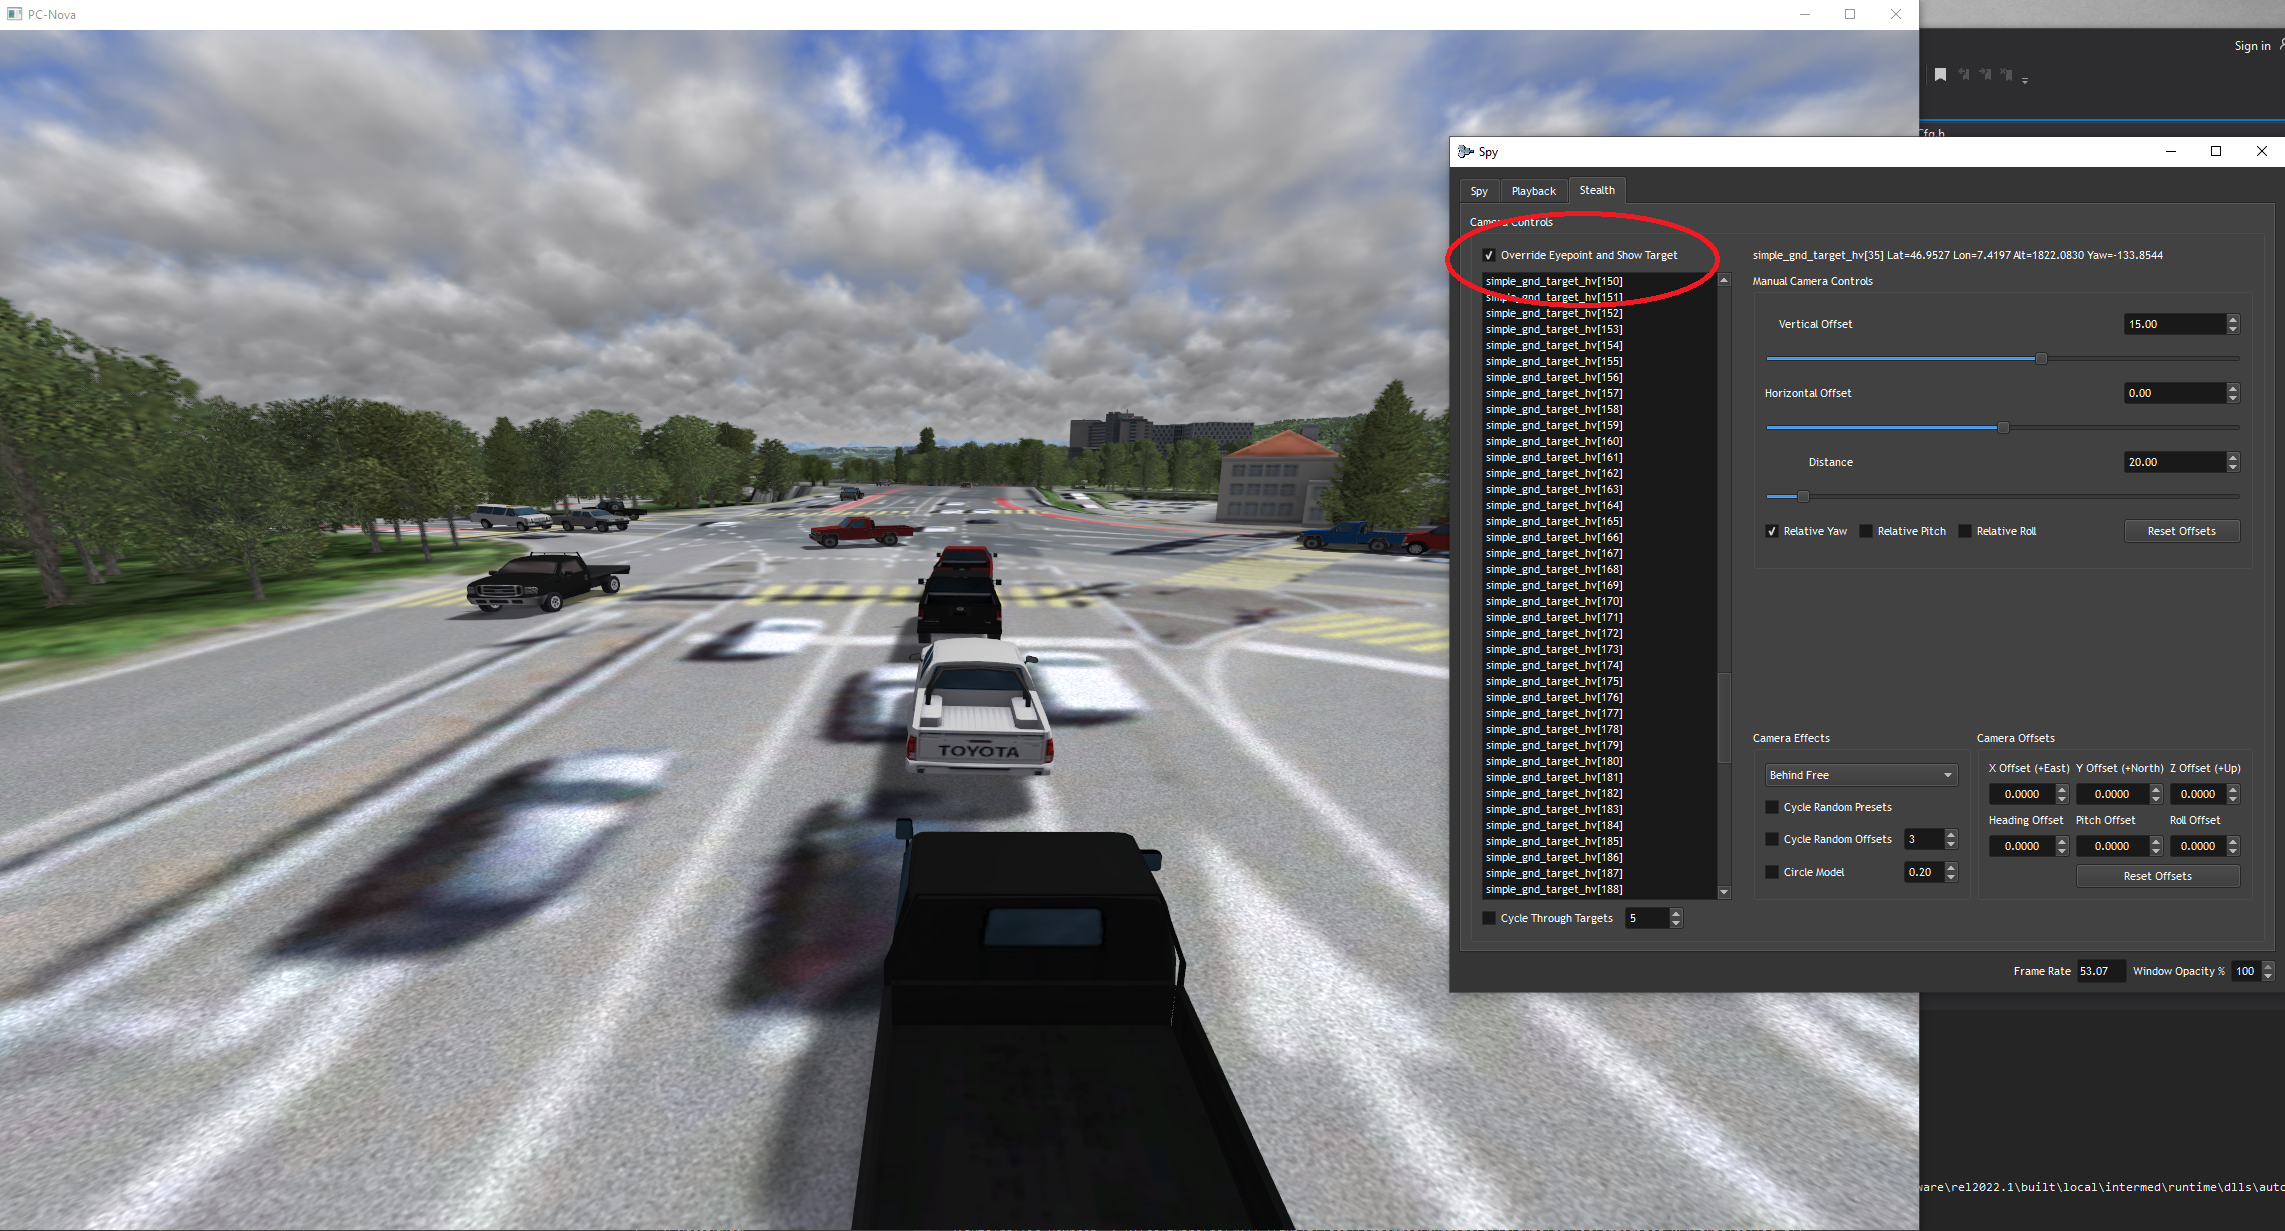
From here you can adjust the position of the camera and even enable some budget effects!
Using SUMO GUI to Run a Simulation
When a simulation is run a file is created allowing you to run it in the SUMO GUI for debugging purpose.
Given the lat, lon of the area in question you can get the tile name using autoTrafficSim --geo2tile.
Once you've located the tile, find the file named "run" and add a .bat extension to it. Double-clicking the batch file will open the SUMO GUI allowing you to run the simulation:
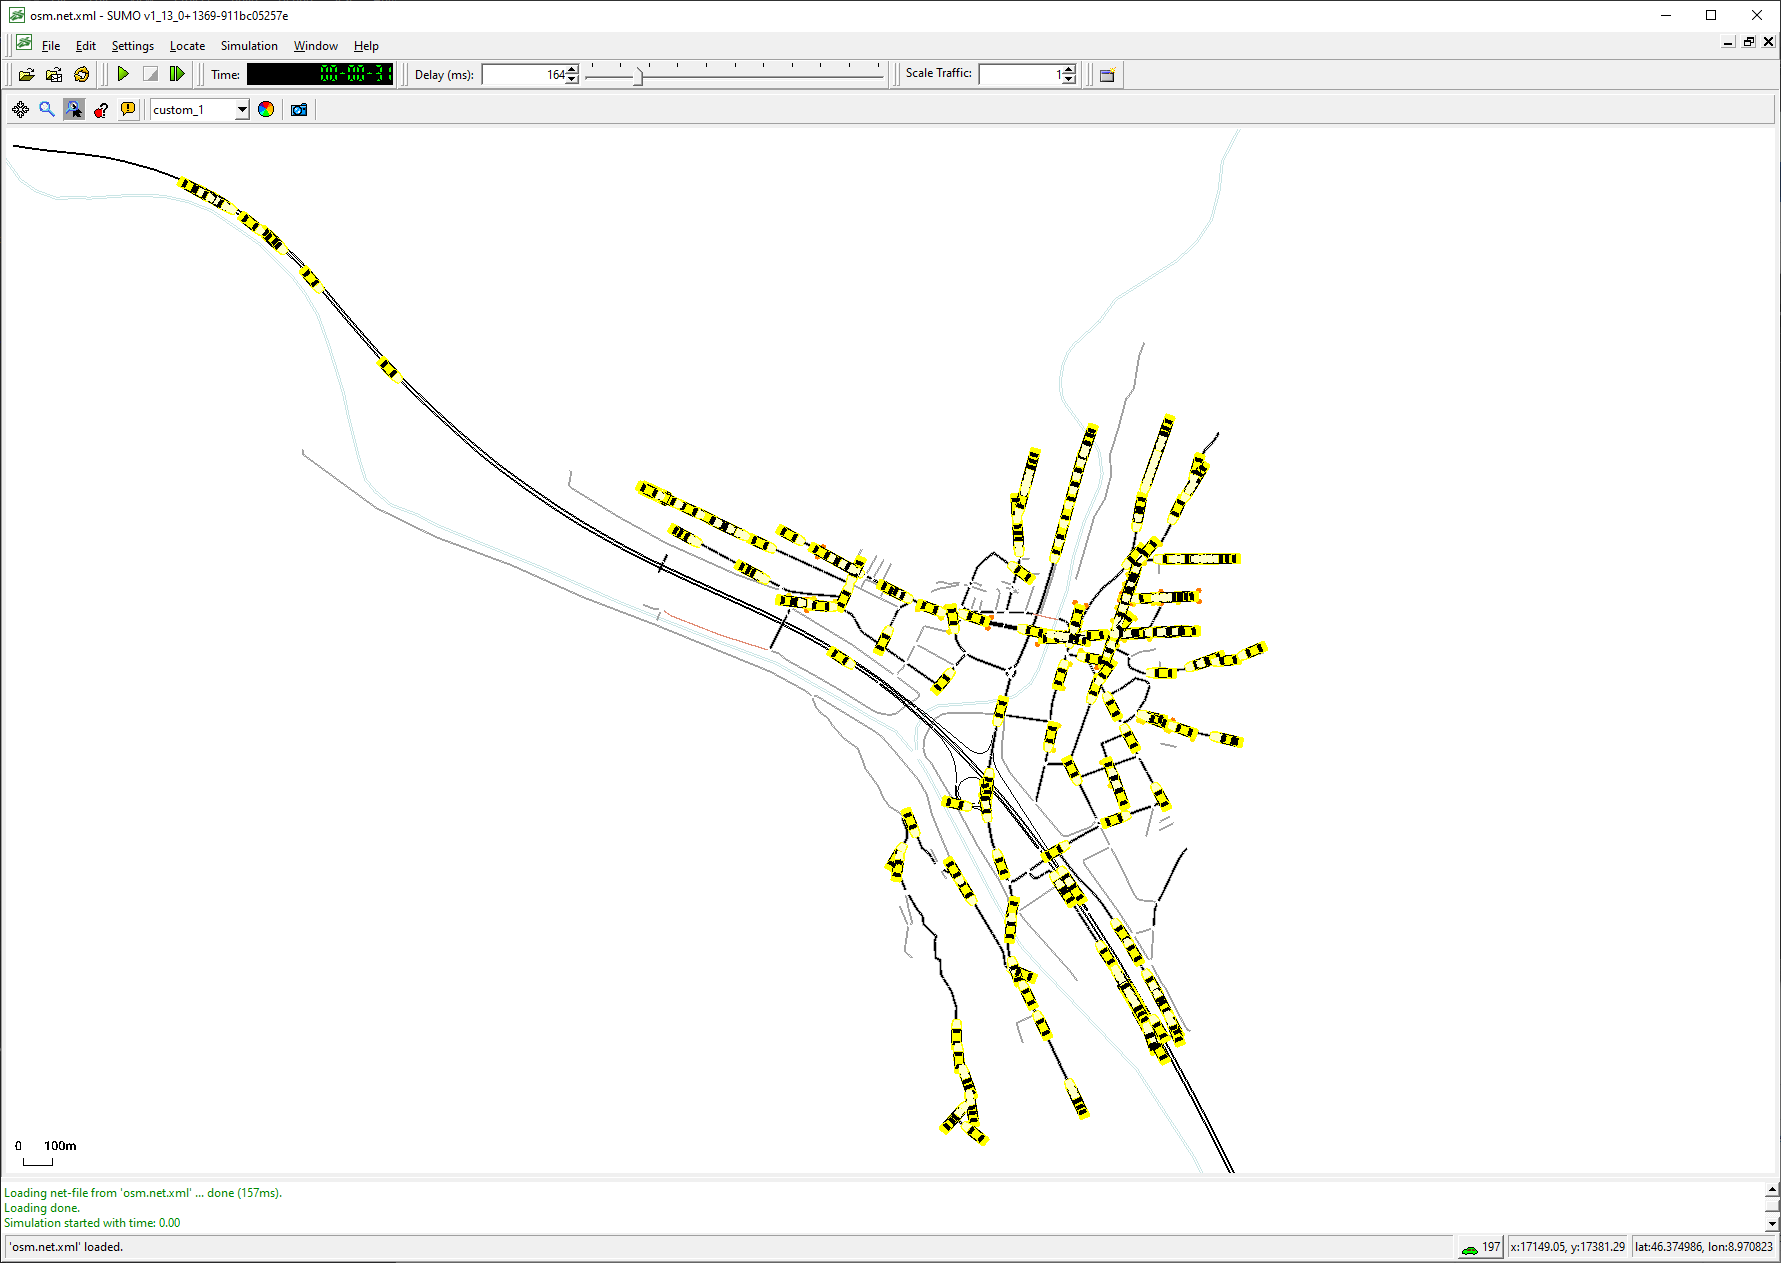
More information on the SUMO GUI can be found here: https://sumo.dlr.de/docs/sumo-gui.html
Using SUMO netedit to View the SUMO Simulation Network
Similarly, you can add a .bat extension to the "edit" file to open the simulation in the SUMO netedit tool. netedit is useful for viewing edge tags when diagnosing bridge/tunnel issues.
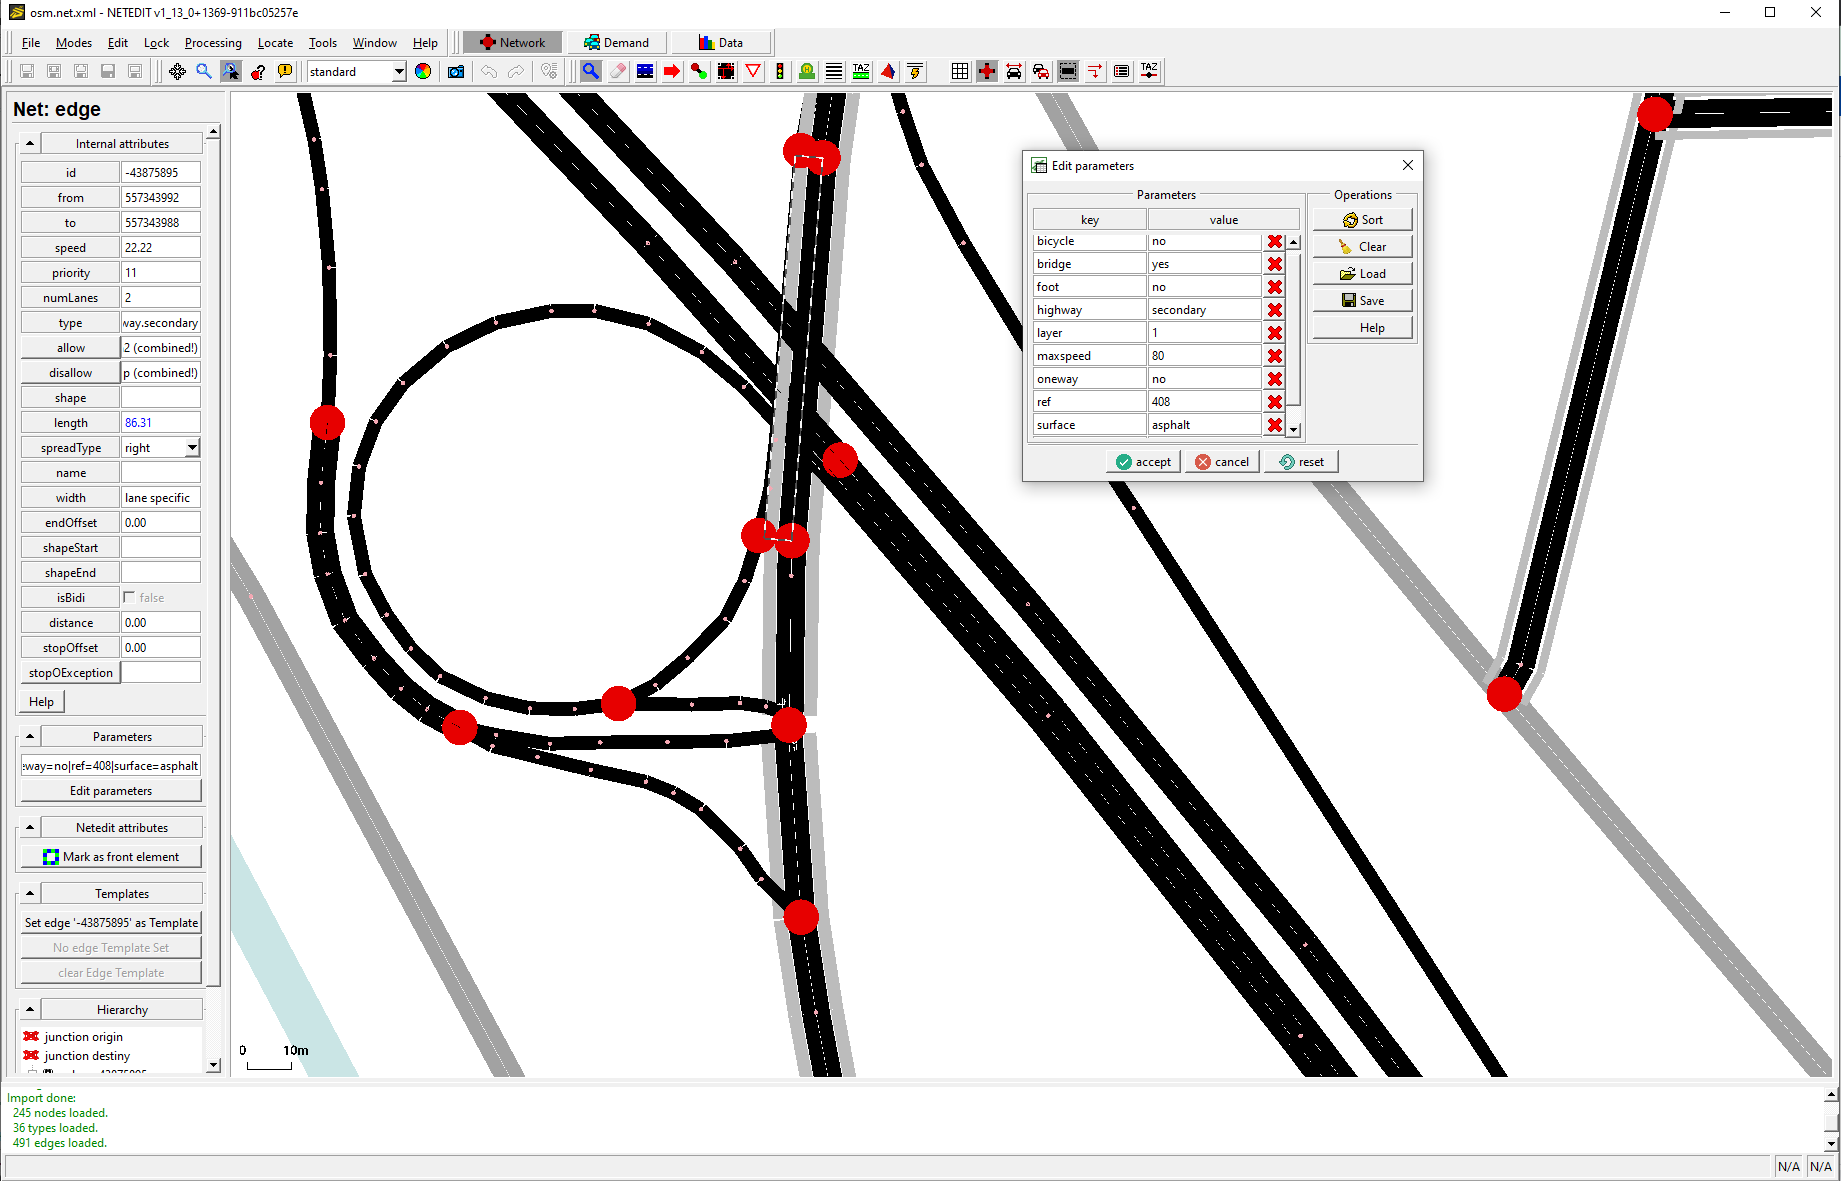
More information on netedit can be found here: https://sumo.dlr.de/docs/Netedit/index.html
Getting the Tile Name from a Lat/Lon with autoTrafficSim --geo2tile
You can run autoTrafficSim with the --geo2tile argument to convert a lat lon to a X.Y tile.
E:\CM\software\<version>\bin\optimized-x64\autoTrafficSim.exe --cfgFile autoTraffic.cfg --geo2tile 46.353034,8.959935
[2022-07-27 11:12:41]    INFO [autoTrafficSim]: Geo position 46.353034, 8.959935 is in tile 8599.5805
All Tokens
Here is an explanation of all the data\versions\dlls\autoTraffic.cfg tokens and what they're used for.
Token | Default | Type | Range | Description |
|---|---|---|---|---|
AutoTrafficDebug | "" | string | A comma separated list of several debugging options. Valid options include: | |
AutoTrafficSimExe | autoTrafficSim.exe | string | The location of the auto traffic simulation executable. The code will search in the following locations: <versionsRoot>\..\bin\<AutoTrafficSimExe> <versionsRoot>\..\bin\optimized-x64\<AutoTrafficSimExe> If all else fails, this can be set to an absolute value. | |
AutoTrafficSumoHome | sumo | string | The SUMO root directory. This is used to set the SUMO_HOME environment variable which is needed by the SUMO python scripts and runtime. Additionally, The code will search in the following locations: <versionsRoot>\..\<AutoTrafficSumoHome> <versionsRoot>\..\..\..\devtools\<AutoTrafficSumoHome> If all else fails, this can be set to an absolute value. | |
AutoTrafficSurroundingTileDepth | 1 | unsigned short | 0-3 | Specifies the number of simulations to run around the ownship. 0 = 1 simulation (useful for debugging) |
AutoTrafficBboxZoomLevel | 14 | unsigned short | 0 - 20 | The size of the simulation tiles, the larger the number the smaller the tile. |
AutoTrafficMaxVehicleScale | 10.0 | float | Allows the user to tweak the amount of _host2pcnova->h2traffic.auto_traffic.max_vehicles distributed to each running simulation. By default, there are 9 simulations running at a time (see AutoTrafficSurroundingTileDepth), and each is given max_vehicles/9 This token allows you to scale that value by (max_vehicles * AutoTrafficMaxVehicleScale) to increase or decrease density. This token can also be used when AutoTrafficDensityScaling is ON. | |
AutoTrafficNumRenderTrucks | 10 | unsigned short | Maximum simulated trucks passed to the runtime for rendering. If the number of simulated trucks across all simulations is larger In the case of trucks and buses, while SUMO makes a distinction they're just simple ground targets to us. We'll give these first crack before | |
AutoTrafficNumRenderBuses | 5 | unsigned short | Same as above. | |
AutoTrafficNumRenderShips | 10 | unsigned short | Same as above. | |
AutoTrafficNumRenderPedestrians | 0 | unsigned short | Pedestrians (actors) are too expensive and are disabled. | |
AutoTrafficDensityScaling | ON | bool | Dedicate more vehicles to populated areas and less to rural areas. When enabled, the density (total length of passenger vehicles accessible lanes) is used to determine how many vehicles a simulation gets. For example, the default AutoTrafficDensityScalingMax is Times Square at AutoTrafficBboxZoomLevel 15 which has When AutoTrafficDensityScaling is ON, they'll get sim_density/max_density * 28 vehicles instead. In highly populated areas, they This is a linear curve, but the token can also be set to "EXP" which changes the formula to sim_density^2/max_density^2 resulting in even less NOTE: This has the effect of making the host specified max_vehicles an upper bound rather than a hard limit. | |
AutoTrafficDensityScalingMax | 370000.0 | float | When AutoTrafficDensityScaling is ON, this number serves as the maximum. When running with AutoTrafficDebug "STATS" enabled, each sim will print their density and it's percentage of the | |
AutoTrafficVehicleTypes | string | Object types will be randomly selected from these comma-delimited lists. For example, setting AutoTrafficShipTypes to "1,2,3,4,5,6,7,8" will randomly select a type 1-8 when a ship is created. SUMO separates vehicles, buses, and trucks as they have different speed, follow distance, and size characteristics. In the case of pedestrians, the types are dependent on your skins.csv and the idle animations on your animations.csv file. | ||
AutoTrafficTruckTypes | string | Same as above. | ||
AutoTrafficBusTypes | string | Same as above. | ||
AutoTrafficShipTypes | string | Same as above. | ||
AutoTrafficPedestrianTypes | string | Same as above. | ||
AutoTrafficPedestrianIdle | string | Like the types, but IDs for idle animations the actors will perform while waiting at an exclusion zone. | ||
AutoTrafficShipWakeType | 0 | char | Sets the wake type for the ships. | |
AutoTrafficForceConformRoadways | OFF | bool | When enabled, turns on simple_gnd_target_hv::conform_roadways for every vehicle. | |
AutoTrafficFadeSeconds | 3.0 | float | Specifies the amount of seconds to fade vehicles in/out as they are created/removed. Don't set this too low or you'll see the vehicles render above ground then snap down after the get the HOT from the isect. | |
AutoTrafficLookaheadSeconds | 10.0 | float | If greater than 0, the ownship position will be dead reckoned by this amount of time to load simulations before we actually enter the new tile. | |
AutoTrafficRenderFov | 120.0 | float | 0-360 | Vehicles in the vertical FOV will be rendered. Can be used to render more traffic in front of the eyepoint. |
AutoTrafficFovFadeDisable | ON | bool | When enabled, vehicles outside the AutoTrafficRenderFov will immediately be removed rather than fading out to free up simple_gnd_target slots faster. This allows more traffic to be pushed in front of the eyepoint. This is on a token in case it's too jarring in stealth or sensor views. | |
AutoTrafficRoadTrafficControl | ON | bool | Allows the auto traffic to also control the road_traffic ICD fields to create traffic in the distance outside of the auto traffic render range. This is on a token to allow hosts to control it if desired. | |
AutoTrafficCache | autoTrafficData | string | The cache folder for creating simulations. Simulations are cached in the form <AutoTrafficCache>/<AutoTrafficBboxZoomLevel>/<tileX.tileY>/... | |
AutoTrafficPythonExe | python.exe | string | The location of the python interpreter. The code will search in the following locations: <versionsRoot>\..\bin\<AutoTrafficSimExe> <versionsRoot>\..\bin\optimized-x64\<AutoTrafficSimExe> If all else fails, this can be set to an absolute value. | |
AutoTrafficRuntimeBuildEnable | ON | bool | Allows users to disable downloading and building new simulations when a new area is visited at runtime. This is desirable on programs where we deliver autoTrafficData for their area of interest and don't want to create traffic when they go elsewhere. | |
AutoTrafficMaxConcurrentBuilds | 50 | unsigned short | The maximum number of simulations that can be build concurrently in --batchBuild mode. | |
AutoTrafficOsmServerUrl | string | OSM overpass API server URL. See https://wiki.openstreetmap.org/wiki/Overpass_API for a list. | ||
AutoTrafficSimBuildRoadTypes | {\"Highway\":[\"motorway\",\"motorway_link\", \"trunk\",\"trunk_link\", \"primary\",\"primary_link\", \"secondary\",\"secondary_link\", \"tertiary\",\"tertiary_link\", \"unclassified\",\"residential\", \"living_street\",\"unsurfaced\", \"service\",\"raceway\", \"bus_guideway\",\"track\", \"bridleway\",\"cycleway\"], \"Waterway\":[\"river\",\"canal\"], \"Route\":[\"ferry\"]} | JSON string | The osmGet.py <code>--road-type</code> option so we can filter downloaded roads. Here's an example of checking everything in the osmWebWizard: {"Highway": ["motorway","motorway_link","trunk","trunk_link","primary", | |
AutoTrafficSimBuildVehOptions | --validate --period 0.1 --trip-attributes "departLane=\"best\"" --lanes --length --min-distance 300 | string | The randomTrips.py options for building routes for vehicles, trucks, buses, and ships For more information: https://sumo.dlr.de/docs/Tools/Trip.html | |
AutoTrafficSimBuildTruckOptions | --validate --period 10.0 --trip-attributes "departLane=\"best\"" --lanes --length --min-distance 600 | string | Same as above. | |
AutoTrafficSimBuildBusOptions | --validate --period 20.0 --trip-attributes "departLane=\"best\"" --lanes --length --min-distance 600 | string | Same as above. | |
AutoTrafficSimBuildShipOptions | --validate --period 300.0 | string | Same as above. | |
AutoTrafficSimBuildPedOptions | --validate --period 2.0 --max-distance 2000 | string | Same as above. | |
AutoTrafficSimBuildAllowFringe | ON | bool | Enables/disables creating routes that begin/end at the edges of the network. | |
AutoTrafficSimBuildFringeOptions | --allow-fringe --fringe-factor 2 --fringe-start-attributes "departSpeed=\"max\"" --allow-fringe.min-length 500 | string | Fringe options. | |
AutoTrafficStartSeconds | 10 | unsigned short | Specifies the seconds to start the simulation at. This allows the simulation to be "fast-forwarded" when enabled to give tiles more density when they're first enabled rather than | |
AutoTrafficSimEndSeconds | 900 | int | The simulation duration in seconds that will be passed to the simulation building tools as well | |
AutoTrafficSimRestartThreshold | 10 | int | As the simulation runs it's course it stops creating new vehicles after AutoTrafficSimEndSeconds has | |
AutoTrafficBuildTruckRoutes | ON | bool | Enables/disables building pedestrian and ship routes. Disabling can speed up simulation builds but you won't be able to enable pedestrians or ships later unless you rebuild. | |
AutoTrafficBuildBusRoutes | ON | bool | Same as above. | |
AutoTrafficBuildShipRoutes | ON | bool | Same as above. | |
AutoTrafficBuildPedestrianRoutes | ON | bool | Same as above. | |
AutoTrafficNumSimTrucks | 5 | unsigned short | Maximum simulated objects per type passed to the runtime for rendering. If the number of simulated vehicles is larger than the number specified here, they will be sorted by distance. | |
AutoTrafficNumSimBuses | 2 | unsigned short | Same as above. | |
AutoTrafficNumSimShips | 5 | unsigned short | Same as above. | |
AutoTrafficNumSimPedestrians | 0 | unsigned short | Same as above. | |
AutoTrafficBridgeBufferMeters | 50.0 | float | 35.0 - 100.0 | The number of meters before/after a bridge edge to also mark as a bridge in meters. The conform_roadways tag needs some time before and after a bridge to avoid dropping through. Additionally, NOTE: Since the sim runs at 1Hz, if you set this number too low, it may have no effect. For example, if a car is traveling at We set the default to 50 -- 50 m/s = 111.8 mph. |
AutoTrafficTunnelBufferMeters | 30.0 | float | 5.0 - 100.0 | The number of meters before and after a tunnel to include. This gives the fading out time to take place and hides inconsistencies between the OSM tunnel data and the visual database. |
AutoTrafficAddedBridgeWays | string | A comma separated list of additional OSM way IDs that should be considered bridges. | ||
AutoTrafficAddedTunnelWays | string | A comma separated list of additional OSM way IDs that should be considered tunnels. |
Cache Structure
The cache structure is in the form <AutoTrafficCache>/<AutoTrafficBboxZoomLevel>/XXXX.YYYY
For example:
E:\CM\data\autoTrafficData\14\4680.6261\.....
E:\CM\data\autoTrafficData\15\17065.11537\...
This allows you to keep different AutoTrafficBboxZoomLevel settings side by side for testing.
Tile Naming Convention
The auto traffic uses the OSM "slippy maps" convention and algorithms to break the world into X.Y tiles. More information can be found here: https://wiki.openstreetmap.org/wiki/Slippy_map_tilenames
Tile Contents
Each X.Y simulation tile contains the following files:
Filename | Description |
|---|---|
bbox.kml | A KML file that can be opened in Google Earth showing a polygon for this simulation's bounding box. |
build_i | The command line used to run the SUMO osmBuild.py script to convert the OSM data to SUMO format. Can be given a .bat extension and rerun to test different settings. More information on osmBuild.py can be found here: |
build_o | The output of the osmBuild.py command in "build_i". Used by the auto traffic at runtime to identify tiles with no road data. |
bus_i | The command line used to run the SUMO randomTrips.py script to create bus routes. Can be given a .bat extension and rerun to test different settings. More information on randomTrips.py can be found here: https://sumo.dlr.de/docs/Tools/Trip.html Note that the options can also be tweaked via AutoTrafficSimBuildTruckOptions and AutoTrafficSimBuildFringeOptions |
bus_o | The output of the randomTrips.py command in "bus_i". Used by the auto traffic at runtime to identify tiles with no viable bus routes. |
cfg | The autoTraffic.cg tokens used when generating this tile. Used for debugging. |
edit | Can be given a .bat extension and run to open the network in SUMO's netedit tool. Useful for debugging bridge/tunnel issues to see if a edge has the needed tag. More info on netedit can be found here: https://sumo.dlr.de/docs/Netedit/index.html |
get_i | The command line used to run the SUMO osmGet.py script for downloading the OSM data. Can be given a .bat extension and rerun to test different settings. More information on osmGet.py can be found here: https://sumo.dlr.de/docs/Tools/Import/OSM.html#osmgetpy Note that the options can also be tweaked via AutoTrafficOsmServerUrl and AutoTrafficSimBuildRoadTypes |
get_o | The output of the osmGet.py script. Used during the simulation building process to determine if the request timed out, was denied (429 Too Many Requests) or completed (200 OK) |
osm.bus.trips.xml | The bus routes created by the "bus_i" command line. Used at runtime to route the buses. |
osm.net.xml | The SUMO network file. |
osm.netccfg | Generated as part of the SUMO netconvert process. |
osm.passenger.trips.xml | The vehicles trips created by the "veh_i" command. |
osm.pedestrian.trips.xml | The pedestrian trips created by the "ped_i" command. |
osm.poly.xml | Generated as part of the SUMO netconvert process. |
osm.polycfg | Generated as part of the SUMO netconvert process. |
osm.ship.trips.xml | The ship trips created by the "ship_i" command. |
osm.truck.trips.xml | The truck trips created by the "truck_i" command. |
osm_bbox.osm.xml | The raw OSM network data generated from the "get_i" command. |
run | A debug file created when a simulation is run. Can be given a .bat extension and run to open and run the simulation in the SUMO GUI. More information on the SUMO GUI can be found here: |
version | The cache version used to check for compatibility issues by autoTraffic.dll |
ped_i ped_o ship_i ship_o truck_i truck_o veh_i veh_o | See bus_i/bus_o. Same concept but for different vehicle classes. |